B2B Terminal Registration
Document Version: 2.3
Register your mobile devices as payment terminals for Tap on Mobile.
Registration Process
Contact your Partner Manager for terminal credentials.
Enter the provided UMID and UTID in your application.
Complete activation to start accepting payments.
Get help with terminal registration
Introduction
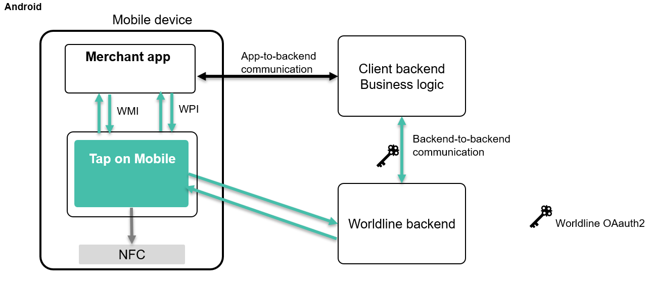
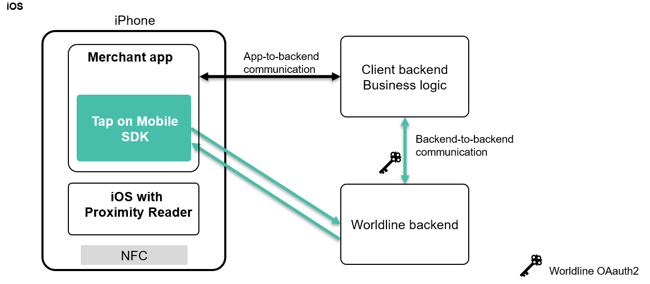
The goal of this document is to explain backend-to-backend (B2B) activation for Tap on Mobile on Android and iOS. B2B activation is always used when operating in integrated mode regardless of using app-to-app or SDK mode.It is also used when third party backend would like to obtain information from acceptance system (like transactions / configuration etc.).
Android architecture
iOS architecture
Tap on Mobile integration modes
Tap on Mobile can be integrated in several operating modes:
- App-to-app: this is the easiest way to integrate and uses Intents on Android. This requires at least two apps; Tap on Mobile and the partner or merchant app. See WPI and WMI documentation for more information.
- SDK: the SDK is integrated with the partner app, this requires more development skills to make it work but brings the best user experience and only requires one app. Refer to the SDK documentation for more information. This solution is only available for iOS for now.
- More to come in the near future
Activation options
Several options to activate a terminal are offered:
- Using online portal with Challenge and Response code (default mode for non-integrated merchant)
- Activation using QR-code (available on Android with version 5.9 and on iOS with app and SDK 1.7.
- Backend-to backend activation (via API - active on iOS and Android)
the option using username and password that was only available on iOS has been removed as of Q3'2025.
This document only describes the new activation flow that is supported as of Android mobile app version 5.9 and iOS SDK 1.7. The previous registration method is no longer documented although it will continue to be supported for some time. For iOS, this deprecated registration method will continue to be supported with SDK 1.7 but support will stop with SDK 1.8 and beyond.
This document only covers backend-to backend activation.
Tap on Mobile Environments
Refer to Environments for available environments
Backend-to-backend activation
Main characteristics of B2B activation
The main characteristics of B2B activation are:
- Activation handled by merchant backend and merchant app
- No additional UI needed
- No manual interaction needed
- Partner backend to be authenticated by Worldline backend
- Available for iOS and Android
Pre-requisites to start using B2B activation
The pre-requisites to start using B2B activation:
- User account at the backend was created (based on request to the acquirer)
- Merchant ID (MID) assigned to the merchant
- Terminals configured in backend for the merchant
- OAuth2 credentials defined for the every environment
- Swagger file (documenting of API)
- Business app supporting B2B activation
- Business server supporting B2B activation
For a user account, merchant ID, terminals and OAuth2 credentials, please reach out to the integration team using the following email: ToM_Integration@worldline.com
The user account consists of a user name and password
The OAuth2 credentials consist of a client _UUID and client_secret. These credentials are linked to a user and we recommend to use a technical user instead of a personal user account. The client_id can be found in the portal. OAuth2 credentials are linked to an environment, so you need separate credentials for sandbox and production.
Example
client_id: xxxxxxxx-xxxx-xxxx-xxxx-xxxxxxxxxxxx
client_secret: xxxxxx
Swagger file
Tap on Mobile backend API specification can be found in the swagger file: swagger fil.
Attention If the API are not displayed , make sure to have /v3/api-docs in the search bar at the top of the screen
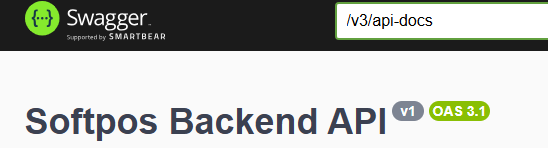
This swagger file is a machine-readable description of all available API and defines what the API offers and how to use it.
This swagger file is only available on the Worldline EU sandbox environment, but applies to all acquirers and environments. Behind every API, there is a label that indicates the type of access that is needed to use the corresponding API; MRC for merchant level users, ACQ for acquirer level and ADM for admin.
Some of the most common API are:
POST /api/v1/users/info: obtaining current context and permissions of the usersPOST /api/v1/transactions/search; find transaction(s) based on input filtering criteriaPOST /api/v1/transactions/export/csv: export transactions in CSV format based on filterPOST /api/v1/merchants/searchPOST /api/v1/devices/searchPOST /api/v1/users/searchPOST /api/v1/terminals/{id}/registration-token: Generate or retrieve registration code for terminalPOST /api/v1/terminals/{id}/registration-token/refresh:DELETE /api/v1/terminals/{id}/registration-token/revokePOST /api/v1/terminals/search: look for available terminalsPOST /api/v1/terminals/{id}/unregister: Unregister Terminal from DevicePOST /api/v1/transactions/{id}/pdf-receipt: get a pdf-receipt for a specific transaction IDPOST /api/v1/transactions/{id}/email-receipt: send a receipt by email for a specific transaction,
Complete list of function request elements is available in ToM API specification (https://sandbox-wl-emea.softpos.eu/swagger-ui/index.html?configUrl=/v3/api-docs/swagger-config#/Terminals/search_3). Tables below summarize most important parameters and function filters.
Example parameters used in many request types:
| Request Parameters | Description |
|---|---|
| Page | Integer defining a zero-based page index (default is 0) |
| Size | Integer defining number of items to be returned in a single page (default is 10) |
| Sort | String defining response list sorting criteria in the format: property,(asc|desc). Default sort order is ascending. Multiple sort criteria are supported |
| Request body | Description |
|---|---|
| contract_id | Merchant tier level identifier or tier level identifiers combination defining which part of terminal structure should be returned |
| vat_id | Merchant tier level identifier or tier level identifiers combination defining which part of terminal structure should be returned |
| Mid | Merchant tier level identifier or tier level identifiers combination defining which part of terminal structure should be returned |
| Tid | Terminal identifier. Adding this field may for use cases where current terminal details need to be checked |
| Connected | Terminal assignment status. true - means that tid is currently linked to a device; false - means that terminal is currently not assigned to any device and available for registration. In this case - id_device field will be attached to ID of device |
| Disabled | Flag informing whether the terminal condition is not temporarily restricted from performing operations |
Overall terminal registration process (via API)
API Authorization
The authorization is based on OAUTH2 standard (https://oauth.net/2/). OAuth 2.0 is an authorization framework that lets a user grant a third‑party application limited access to their resources on a server, without giving that app their login credentials.
After obtaining the token for the used credentials, all API that are accessible with the level for the user can be used. We refer to the received token as access_token.
Request Parameters
The following parameters are used in the OAuth2 token endpoint (/oauth2/token).
First you need to obtain the OAUTH2 token to use for further requests:
| Parameter | Description |
|---|---|
| grant_type | A string indicating which grant type is being used: client_credentials app-to-app access with its own credentials |
| Scope | The scope of the OAuth2 token, indicating the permissions that are granted to the client |
| client_id | A unique identifier for the client application, issued by the authorization server |
| client_secret | A secret string used to authenticate the client application with the authorization server |
POST {baseUrl}/oauth2/token
{
  "grant_type": "client_credentials",
  "client_id": "client_id",
  "client_secret": "client_secret"
}
According to RFC 6749 - grant_type should be sent in headers with x-www-form-urlencoded
Authorization handled can be BASIC (based on client_id and client_secret) as standard approach or alternatively with JWT certificates.
Response Parameters
The response from the token endpoint will include a number of parameters:
| Parameter | Description |
|---|---|
| Access_token | A string containing the access token, which will be used for the terminal authentication endpoint |
| Scope | The scope of the access token, indicating the permissions that are granted to the client |
| token_type | The type of access token. For example "Bearer" |
| expires_in | The number of second before the access token expires and a new one must be requested. This value is configurable per channel definition at backend side. |
baseUrl - is the path to the environment ie. (https://sandbox-wl-emea.softpos.eu)
Example response:
{
  "access_token": "eyJraWQiOiI4MDBhIi...<truncated>",
  "scope": "openid vpos",
  "token_type": "Bearer",
  "expires_in": "29999"
}
This token must be attached to each request to the API in authorization header.
Terminal search request
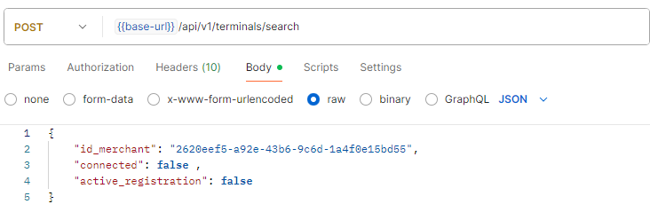
When making a search for an available terminal, several filters can be added to the request body. Below is a sample terminal search request. If the OAuth2 credentials are linked to multiple merchant ID, id_merchant has to be specified, connected to find a terminal that is not yet in use and active_registration to assure that the registration process has not yet started.
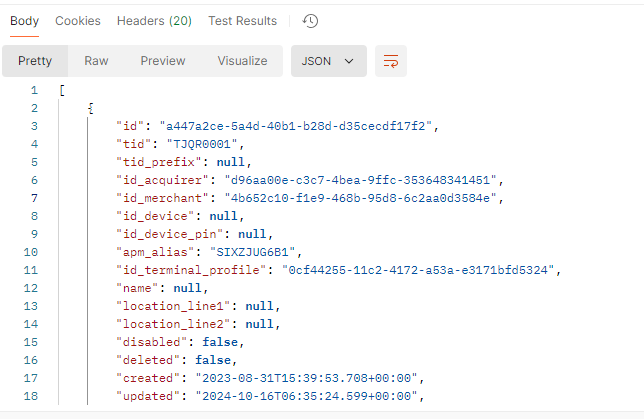
sample response to terminal search request
Transaction search request
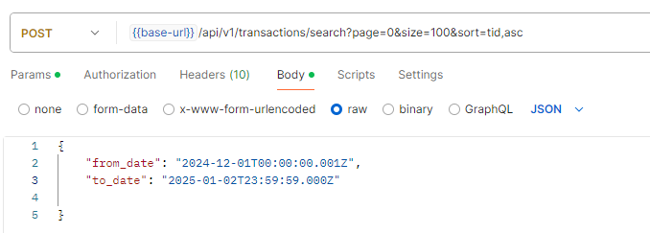
Sample transaction search request
Sample response to transaction search request
API is equipped with pagination mechanism, x-total-count parameter in the header provides total number of records returned in whole set. Only the records accessible by the user permissions and the context are returned.
If multiple records are returned (it can be checked with , x-total-count parameter in the response header) and their number is higher than page limit, then you need to obtain next set of records increasing current number of records page (as input url parameter).
Each object inside the system has its own unique ID, based on UUID format (as defined in RFC 9562).
Assigning selected terminal to an application
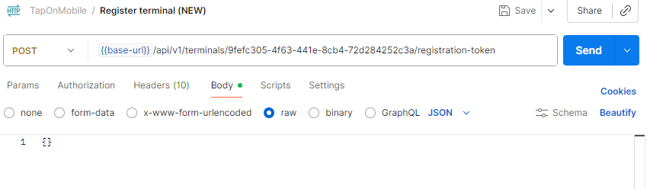
Once an available terminal has been selected, a registration token can be requested from the backend using the API call POST /api/v1/terminals/{id}/registration-token, where id a terminal UUID stored in ToM backend.
The structure of the UUID is a standard UUID (Universally Unique Identifier) format of 32 hexadecimal characters, representing a 128-bit number, formatted as xxxxxxxx-xxxx-xxxx-xxxx-xxxxxxxxxxxx. These five groups are divided into 8, 4, 4, 4, and 12 hexadecimal digits, respectively, with hyphens separating the groups. Each 'x' represents a hexadecimal digit (0-9 or a-f), which can be upper or lower case.
Important note: this function is applicable only to not connected terminals. An attempt to assign already connected terminal will result with a "Terminal already used" response message (with http error 409). In this case it is also possible to deregister such terminal - releasing it for further registration with /terminals/unregister method
Before making the request, the terminal will look like this in the portal

The circle before the TID is empty, meaning the terminal is available for registration.
sample request for terminal registration
sampe response for terminal registration

The response contains the activationToken, creation date and expiration time. Looking at the sample above, this token is valid for 4 hours. This means that it gives the merchants 4 hours the time to activate the terminal. When integrated, activation will normally occur within less than a minute.
If for any reason, the expiration can be refreshed using the API call POST /api/v1/terminals/{id}/registration-token/refresh

The response is the same as for the initial token request
Once the token is returned, the status of the terminal at the portal changes to a solid filled circle in front of the TID, see below:

There is also a possibility to revoke the activation request using the API call DELETE /api/v1/terminals/{id}/registration-token/revoke

If this succeeds, the TID is again free and is shown as such in the portal:
Assigning selected terminal to an application with email
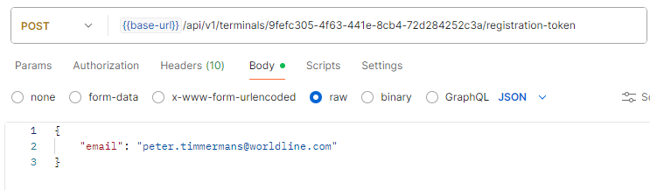
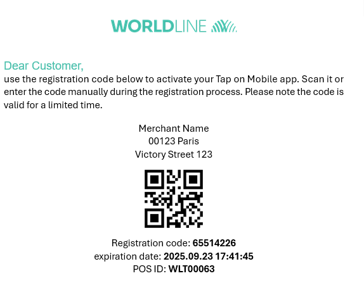
The case described in the paragraph 3.8 requires no interaction from the user. There is however also an option to send an email to the user with a QR-code that allows to activate the device. The request has one optional argument, this is an email that can be used to send an mail with the activation code.
Sample registration request with email parameters and body
The response is the same as without an email in the request.
sample response registration with email
For a sample of the email, see below: The QR-code can be scanned by the smartphone or the code can be entered manually.
Use case: terminal not registered
This use case is when the app is installed, reinstalled or unregistered and the terminal UUID is not known . This covers the complete flow.
Use case: terminal already activated
This use case occurs when the app was closed or the device restarted but the terminal has been registered before. In this case, no interactions with the backend are needed.
Android specifics
Although the flow is identical on Android an iOS and the interface with the backend is the same, the detailed implementation is a bit different. Android uses the WMI Intent and below are the service types for activation.
WMI_SVC_CHECK_STATUS
This function is intended to be used outside of payment acceptance context to determine the current Tap on Mobile application status and assess whether it is properly authenticated and ready to perform payment acceptance functions.
WMI_SVC_REGISTER
This function is intended to be used outside of payment acceptance context to determine the current Tap on Mobile application status and assess whether it is properly authenticated and ready to perform payment acceptance functions.
WMI_SVC_AUTH_UNREGISTER
This function is intended to be used only with already registered terminal. It allows to unregister the currently assigned TID from the mobile application instance.
For more detailed information on Android specific implementation, see the WMI specification document.
iOS specifics
Although the flow is identical on Android an iOS and the interface with the backend is the same, the detailed implementation is a bit different. iOS uses the SDK and below are the specific functions for activation.
isDeviceRegistered()
This function doesn't require any parameter inputs and is used to confirm if a device is already registered
verifyRegistrationToken()
Validates the one-time registration code supplied, ensuring the registration process can begin.
This function requires one parameter: registrationToken:
beginTokenRegistration()
Initiates the token registration process for the terminal, preparing the device to be securely assigned and enrolled as a payment terminal. This function requires one parameter: registrationToken
endTokenRegistration()
Completes the token registration process and activates the terminal. This final step finalizes the assignment and securely enables the device to function as a payment terminal.
This function requires two parameters: registrationToken: and pin:
getTerminalID()
Retrieve the terminal Id of the terminal used in the current device.
For more detailed information on iOS specific implementation, see the iOS SDK specification document.
Retrieving and managing merchant's terminal structure
Merchant applications access to ToM backend API should reflect the complete merchant organization structure. Organization structure uses up to three tier levels, i.e.:
- CONTRACT_ID
- VAT_ID#1
- MID#11
- MID#12
- […]
- MID#1n
- VAT_ID#2
- MID#21
- […]
- VAT_ID#n
- MID#31
- MID#32
- […]
- MID#3n
- VAT_ID#1
CONTRACT_ID is optional and only used in case lower level tiers require aggregation;
VAT_ID is optional and only used in case lowe level tier requires aggregation;
MID is the lowest and most common merchant organization structure tier; terminals (defined by uuid values and TIDs) are allocated on a MID level.
Merchant structure is always assigned and edited by the acquiring entity. However, merchant's 3rd party application backend should be capable of retrieving this structure from ToM backend, track the potential changes in it and be capable of deciding which TID should be assigned during the registration process.
ToM API documentation lists several merchant level functions that may be used for terminal management, however a suggested function for retrieving current merchant terminal structure is POST /api/v1/terminals/search.
- https://developer.android.com/guide/components/intents-filters - google description of intents
Document history
| Date | Version | Author | Description |
|---|---|---|---|
| 17/12/2024 | 0.0.1 | Peter Timmermans | Initial version of this document |
| 22/01/2025 | 0,0,2 | Arkadiusz Lipiec | Added clarifications |
| 23/01/2025 | 1.0 | Peter Timmermans | Review and release version 1.0 |
| 10/09/2025 | 2.0 | Peter Timmermans | Use new activation process |
| 23/09/2025 | 2.1 | Peter Timmermans | Adjustments after feedback team |
| 26/09/2025 | 2.2 | Michal Nowak, Przemysław Kulesza, Peter Timmermans | Feedback after review |
| 02/10/2025 | 2.3 | Peter Timmermans | Updated Terminal Search request body |
| . | |||