iOS SDK Documentation
Introduction
- The TapOnMobile SDK is a framework designed to ease the usage of Apple Tap to Pay on iPhone functionality.
- If offers the following functionalities:
- SDK Initialization
- Device preparation
- Backend-to-backend terminal activation
- Merchant portal terminal activation
- Backoffice terminal activation
- Transactions
- Sale
- Refund
- Reversal
- QR payment
- cancel QR payment
- Other core functionalities:
- Last transaction
- Transactions History
- Terminal Info
- Contactless Reader Test
- Unregister
- Validate transaction
- Digital receipt
- Transactions statistics
- Helper functionalities.
Pre-requisites
Apple
- Third-party applications must have Apple's Tap To Pay on iPhone entitlement to be able to use the Proximity Reader functionality. You can find more information here: https://developer.apple.com/documentation/proximityreader/setting-up-the-entitlement-for-tap-to-pay-on-iphone
- To use the Sandbox environment, you must create a sandbox account on Appstore Connect portal. You can find more information here: https://developer.apple.com/help/app-store-connect/test-in-app-purchases/create-a-sandbox-apple-account/
Worldline
You need a Worldline Tap on Mobile Contract
Technical requirements
- An iOS version that has been released in the last 12 months, see https://support.apple.com/en-us/100100
- Proximity reader functionality is only available for iPhones 11 and above.
- Xcode 26.3
- Swift 5+
- Location permission enabled for transactions, with SDK helpers to ensure proper configuration.
- When using an MDM, IP Addresses have to be white listed.
Environments
Refer to Environments for available environments
Get TapOnMobile SDK library
To get the library, contact Worldline to get started. The initial integration pack for the SDK will include the latest version of the SDK .framework, the corresponding documentation in PDF format and comprehensive sample projects in both Swift and Objective-C to facilitate the initial integration. Each new release will include the latest version of the SDK along with its corresponding documentation and sample projects.
External Links:
Add TapOnMobile SDK into your Xcode project
Using Swift Package Manager
In your Project settings, under Package Dependencies:
- Click on the plus icon to add a new Package.
- Click the Add local button.
- Then select the path to the provided TapOnMobile SDK package:
- TapOnMobileSDK → Standard Swift version.
- TapOnMobileSDK_Objc → Objective-c compatible version.
- Add the package to your app Target.
- Make sure the library is properly added to your Target under Frameworks, Libraries, and Embedded.
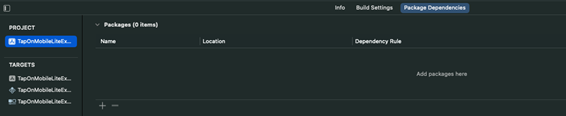
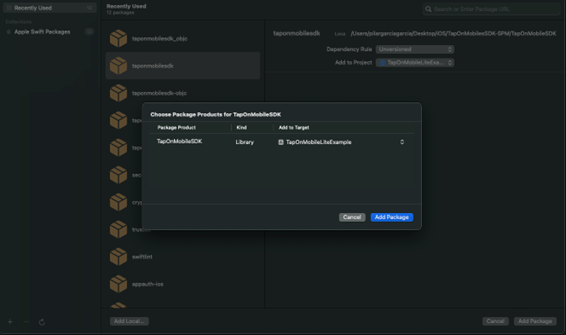

Using static xcframework
- Import the framework file
- Copy "TapOnMobileSDK.xcframework" and "TapOnMobileSDKLogger.xcframework" into your project and in the root of your target. This can be done directly by dragging and copying the file using the "Project navigator". When copying the file, select the required targets that will use the SDK.
- Select your project from the "Project navigator" in Xcode.
- Select your target from "TARGETS".
- Select the "General".
- Scroll to "Frameworks, Libraries, and Embedded Content".
- Under the "Name" title it will appear "TapOnMobileSDK.xcframework".
- Under the "Filters" title "Always Used" should be already selected.
- Under the "Embed" title select "Embed & Sign".
- Copy "TapOnMobileSDK.xcframework" and "TapOnMobileSDKLogger.xcframework" into your project and in the root of your target. This can be done directly by dragging and copying the file using the "Project navigator". When copying the file, select the required targets that will use the SDK.
- Import into the code
- Add this import into the code to have access to the SDK: import TapOnMobileSDK
- Everything is ready to use the SDK.

- Add external dependencies:
- Visa sensory framework: Add VisaSensoryBranding.xcframework following the same process as previous xcframeworks.
- Mastercard sensory framework: Add MastercardSonic.xcframework following the same process as previous xcframeworks.
- Support for versions lower than iOS 16.4: If your app has a minimum iOS version lower version than iOS 16.4. Follow the next steps to avoid crash for missing ProximityReader's symbols:
- Go to "Frameworks, Libraries, and Embedded Content", as explained in the "Import the framework file" step.
- Click the add "+" button and select the "ProximityReader.framework".
- Then go to the "Build Phases" tab, and select "Link Binary With Libraries".
- Then change the status of the ProximityReader.framework as "Optional".

Code execution stages
Note: You can find more information on the Quick Guide section
- SDK Initialization pre-requisites. Environment information should be provided.
- Initializing the SDK.
- Register the device via merchant portal, or backend-to-backend token based activation.
- Call device preparation. This must be done after registration/login or backend-to-backend terminal activation and after opening the app from background.
- Usage of key features: For security purposes transactions require the location to be enabled and the location services permission to be accepted by the user.
- Transactions
- Other core functionalities
- Helper functionalities
This diagram summarizes the sequence of steps:
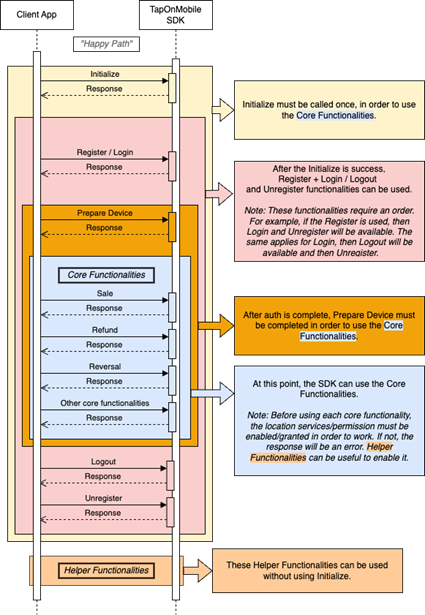
Overall, it's necessary to ensure your device supports Tap to Pay on iPhone. Take a look at the "SDK Initialization" section to check how it's done.
With this verified it is possible to start with the initialization. Init requirements are:
- Environments: Configure the environment by setting up necessary parameters.
Once the initialization has been completed, let's dive into the features of TapOnMobile. The authentication process is the first feature to explore, as we have two available options:
- Backend-to-backend token based activation: This process is a little complex as it requires more integration but more user friendly. It allows the client app to only have one authentication mechanism and tie the terminal activation to the custom client authentication. It involves four steps: token verification, begin token registration and end token registration. Check the "Backend to backend token activation" section to see how it works.
- Merchant portal challenge code terminal activation: This process requires less integration, but it requires the merchant portal to register users, save their secure code code and device model, and assign them a terminal ID. The registration process involves three steps: Begin Registration, Enter Code in Portal, and Complete Registration. You can check the "Registration" section to see how it works. After completing the registration process, the user can log in using their secure code code chosen during registration.
Both authentication processes create a session token and allows the user to access the app for a period before the session expires. The session duration is approximately ten minutes in the sandbox environment and around 8 hours in the production environment.
Once the session is set up, the SDK is ready to perform transactions, core functionalities, or other helper functionalities:
- Transactions
- Sale
- Refund
- Reversal
- QR Payment
- Cancel QR Payment
- DCC Transactions
- Other core functionalities:
- Last Transaction
- Get Init Info
- Get Transaction Statistics
- Transactions History
- Terminal Info
- Contactless Reader Test
- Unregister
- Validate Transaction
- Digital Receipt
- Transaction Statistics
- Update Secret Code
- Helper functionalities:
- Check Location
- Request Location
- Check Device Registered
- SDK Version
- Get Terminal Id
- Session Expiration
Diagrams
Tap on Mobile SDK - Terminal Not Registered Flow
Tap on Mobile SDK - Terminal Registered Flow
Tap on Mobile SDK - Session expired Flow
SDK Initialization
Check Tap to Pay on iPhone Supported
Before initializing the SDK it is possible to check if Tap to Pay on iPhone supported by the device. Else the Initialization method will return TapOnMobileError.cardReaderSession(.unsupported) error.
To check this requirement, the method isTapToPaySupported can be used. This method returns a boolean indicating whether the current device supports Tap to Pay on iPhone.
public func isTapToPaySupported() -> Bool {
    // implementation goes here
}
Code block 1 Function
TapOnMobile.shared.isTapToPaySupported()
Code block 2 Usage
If this method returns true It means the device has the Proximity Reader hardware and can handle Tap to Pay on iPhone, otherwise it is not available.
Initialization
This section covers how to properly initialize the SDK and all the parameters required for the process.
public func initialization(
    environment: Environments,
    appVersion: String? = nil,
    language: TapOnMobileLanguage? = nil
) -> AnyPublisher<Result<Success, TapOnMobileError>, Never> {
    // implementation returns a publisher
}
Code block 3 Function
This function requires the following parameters:
- environment: String - The environment to be used by the SDK. Please review the environments section to check all possible environments.
- appVersion: String? - The version of the application that is using the SDK. This optional parameter can assist in logging by identifying the specific version of the app in use. The recommended format is "X.Y.Z".
- language: TapOnMobileLanguage? - The setting that allows user to choose the language of the UI manage by TapOnMobileSDK. This optional parameter is a an enum listing all supported languages. If set to nil, English will be used for SDK-UI.
TapOnMobile.shared.initialization(
    environment: <code>,
    appVersion: <code>,
    language: <code>
)
Code block 4 Usage
public enum Environments: String, CaseIterable {

    case uatEU
    case sandboxEU
    case preEU
    case prodEU

    case uatANZ
    case sandboxANZ
    case preANZ
    case prodANZ

    case uatPayone
    case sandboxPayone
    case prePayone
    case prodPayone

    case uatPayPhone
    case sandboxPayPhone
    case prePayPhone
    case prodPayPhone

    case uatCAWL
    case sandboxCAWL
    case preCAWL
    case prodCAWL

    case uatOPP
    case sandboxOPP
    case preOPP
    case prodOPP

    case uatING
    case sandboxING
    case preING
    case prodING

    public internal(set) static var current: Environments {
        get { /* implementation */ }
        set { /* implementation */ }
    }
}
Code block 5 enum Environments
Step-by-Step Guide:
- Initiate the initialization process: Use the initialization method provided by TapOnMobile.shared to initialize the SDK:
- Handle the result:
- success(Success): If the process finishes successfully a Success will be returned.
- failure(TapOnMobileError): If the method encounters an error, an error of type TapOnMobileError is provided. For a detailed guide on handling failures returned by this method, please refer to the Error Handling section.
You can find an example in LandingViewMode.swift inside TapOnMobile-iOS-SDK-lite-example project.
IMPORTANT NOTE: If the initialization has not been completed successfully all main functionalities will not be available.
Backend-to-backend token based activation
Here you can find the process to activate and authenticate your device terminal using the backend-to-backend solution.
The token can be retrieved using the merchant API or the online portal. When using the online portal, the information can be shown with a QR-code or send by email to the device.
Terminal registration is a secure, three-step process:
- Verify the one-time registration code.
- Begin token registration.
- End token registration and activate the terminal.
For security reasons, we need this communication to be handled by your backend. This is needed to make sure security measures are put in place and terminal activation is not tampered, as this process relies on good authentication and control handled by your system.
Pre-requisites: Before beginning the registration process, it's important to check that your device meets the following requirements:
- Your device must support 'Tap to Pay on iPhone' functionality.
- The SDK must be properly initialized before starting the registration.
- Obtain a valid registration token from your backend or corporate portal, authorized by your organization.
Step-by-Step terminal activation guide:
Below you can find a brief explanation of the terminal activation with a diagram of the process. Notice that this uses a granular approach that follows the steps at the Backend side. All three steps must be executed in the correct enumerated sequence.
- Verify token registration: Ensure the registration code provided is valid and ready for use.
- Begin token registration: If the code is valid, initiate token registration.
- End token registration: Finish registration with the provided secure code (if required) to activate the terminal on the device.
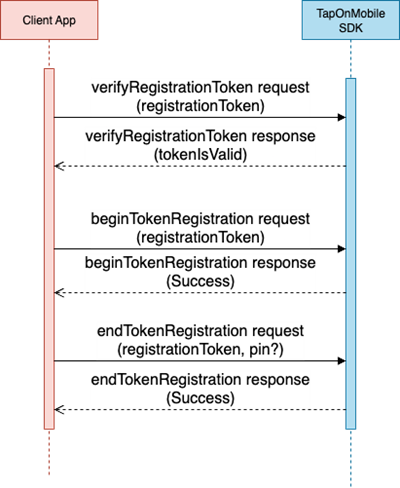
Verify token
Validates the one-time registration code supplied, ensuring the registration process can begin.
This function requires one parameter:
- registrationToken: String - The token to be used for this registration process.
Step-by-Step guide:
- Verify the Code:
- Start by calling the verifyRegistrationToken function and provide the registration code obtained from your backend or portal.
- Handle the Result:
- success(Bool):
- true: The code is valid. You may continue to begin token registration
- false: The code is invalid. Prompt the user to check the code or request a new one. failure(TapOnMobileError): If the method encounters an error, an error of type TapOnMobileError is provided. For a detailed guide on handling failures returned by this method, please refer to the Error Handling section.
- success(Bool):
public func verifyRegistrationToken(
    registrationToken: String
) -> AnyPublisher<Result<Bool, TapOnMobileError>, Never> {
    // implementation returns a publisher
}
Code block 6 Function
public func verifyRegistrationToken(
    registrationToken: /* value here as String */
) {
    // implementation
}
Code block 7 Usage
Begin token registration
Initiates the token registration process for the terminal, preparing the device to be securely assigned and enrolled as a payment terminal.
This function requires one parameter:
- registrationToken: String - The token to be used for this registration process.
Step-by-Step guide:
- Verify the Code:
- Call the beginTokenRegistration function with the validated registration token (registration code).
- Handle the Result:
- success(Success):
- The registration process was properly initialized.
- failure(TapOnMobileError):
- If something goes wrong during registration initialization, the function returns an error describing what happened. For a detailed guide on handling failures returned by this method, please refer to the Error Handling section.
- success(Success):
public func beginTokenRegistration(
    registrationToken: String
) -> AnyPublisher<Result<Success, TapOnMobileError>, Never> {
    // implementation returns a publisher
}
Code block 8 Function
public func beginTokenRegistration(
    registrationToken: String
) -> AnyPublisher<Result<Success, TapOnMobileError>, Never> {
    // implementation returns a publisher
}
Code block 9 Usage
End token registration
Completes the token registration process and activates the terminal. This final step finalizes the assignment and securely enables the device to function as a payment terminal.
This function requires two parameters:
- registrationToken: String - The token to be used for this registration process.
- pin: String? - The secret secure code or code used to confirm and finalize activation. If it's not provided the SDK will handle it internally.
Step-by-Step guide:
- Verify the Code:
- Call the endTokenRegistration function with the validated registration token (registration code) and the optional secure code.
- Handle the Result:
- success(Success):
- The registration process ended successfully.
- failure(TapOnMobileError):
- If something goes wrong during registration initialization, the function returns an error describing what happened. For a detailed guide on handling failures returned by this method, please refer to the Error Handling section.
- success(Success):
public func endTokenRegistration(
    registrationToken: String,
    pin: String?
) -> AnyPublisher<Result<Success, TapOnMobileError>, Never> {
    // implementation returns a publisher
}
Code block 10 Function
public func endTokenRegistration(
    registrationToken: String,
    pin: String?
) -> AnyPublisher<Result<Success, TapOnMobileError>, Never> {
    // implementation returns a publisher
}
Code block 11 Usage
You can find an example in QRRegistrationViewModel.swift file inside TapOnMobile-iOS-SDK-lite-example project.
Handle Session expiration
After completing registration, you need to know how to handle session token expiration. To do this, review the sessionExpiration section and be aware of the following points:
- When the session token expires, we will need to log in with the secure code entered during registration.
- Be careful when the token expires, so it doesn't happen in the middle of a transaction.
- Check the [Expiration Section]146) Quick Guide section for more information.
Merchant portal challenge code terminal activation
Here you can find the process to activate and authenticate your device terminal using the challenge code for the registration, after that, login with secure code can be used for authentication.
This section covers how you register your application. Please follow these guidelines closely to ensure a smooth registration process. Registration is only needed once, unless app is uninstall or device is unregistered.
Pre-requisites: Before beginning the registration process, it's important to check that your device meets the following requirements:
- Your device must support 'Tap to Pay on iPhone' functionality.
- The SDK must be properly initialized before starting the registration.
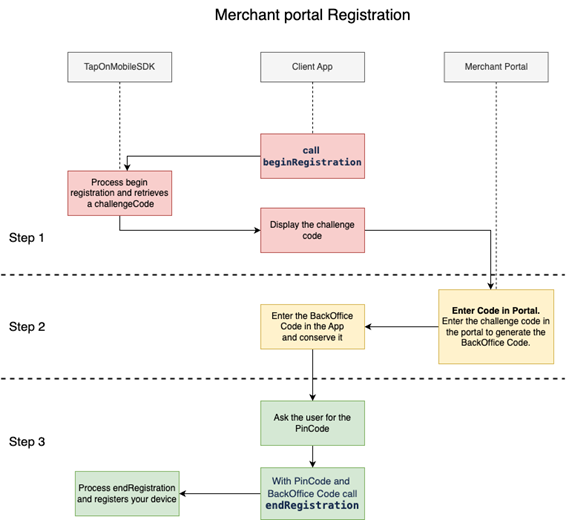
Step-by-Step Registration Guide:
- Begin Registration: Start by calling the beginRegistration function. This function will provide you with a 'Challenge Code'. You'll need this code for the next step, so keep it handy.
- Enter Code in Portal: Take the 'Challenge Code' you received and enter it into the designated portal for registration. By doing this, the portal will generate a 'BackOffice Code'. You will require this code for the final step in the registration process.
- Complete Registration: With the 'BackOffice Code' in hand, proceed to call the endRegistration function. This step will also prompt you to input a secure code for logging in. After successfully completing this step, you can verify the registration by calling the isDeviceRegistered function. If everything is in order, this function should return true, indicating that your device is now registered.
Begin Registration
This function does not require any input parameters. It's used to initiate the registration process for your device.
public func beginRegistration() -> AnyPublisher<Result<String, TapOnMobileError>, Never> {
    // implementation returns a publisher
}
Code block 12 Function
TapOnMobile.shared.beginRegistration()
TapOnMobile.shared.beginRegistration()
Code block 13 Usage
Step-by-Step Guide:
- Initiate Device Registration: Use the beginRegistration() method provided by TapOnMobile.shared to initiate the device registration process.
- Handle the result:
- success(String): In case of a successful registration, the challenge code to introduce in the merchant portal is provided.
- failure(TapOnMobileError): If registration encounters an error, an error of type TapOnMobileError is provided. For a detailed guide on handling failures returned by this method, please refer to the Error Handling section.
TapOnMobile.shared.beginRegistration()
    .receive(on: DispatchQueue.main)
    .sink { result in
        switch result {
        case .success(let challenge):
            self.registerCode = challenge
            print("Begin device registration: Success. Complete the steps to finish device registration.")
        case .failure(let error):
            print("Begin device registration: Error: \(error)")
        }
    }
    .store(in: &disposables)
Code block 14 Example
Complete Registration
This section covers how to complete the registration process. Please follow these guidelines closely.
public func endRegistration(
    backofficeCode: String,
    pin: String?
) -> AnyPublisher<Result<Success, TapOnMobileError>, Never> {
    // implementation returns a publisher
}
Code block 15 Function
This function requires two parameters:
- backOfficeCode: String - This is the 'Back Office Code' response from the merchant portal.
- pin: String - The secure code for user login.
TapOnMobile.shared.endRegistration(
    backofficeCode: /* backoffice code here as String */,
    pin: /* pin here as String? */
)
Code block 16 Usage
Step-by-Step Guide:
- Ending Device Registration: Utilize the endRegistration(backofficeCode: inputCode, pin: pin) method provided by TapOnMobile.shared to finalize the device registration process.
- Handle the result:
- success(Success): In case of a successful registration completion, a success is returned.
- failure(TapOnMobileError): If an error occurs during the registration completion, an error of type TapOnMobileError is returned. For a detailed guide on handling failures returned by this method, please refer to the [Error Handling](/tap-on-mobile/ios/iOS-Error-Handling) section.
TapOnMobile.shared.endRegistration(backofficeCode: inputCode, pin: pin)
    .receive(on: DispatchQueue.main)
    .sink { result in
        switch result {
        case .success:
            print("Finishing device registration: Success.")
        case .failure(let error):
            print("Finishing device registration: Error: \(error)")
        }
    }
    .store(in: &disposables)
Code block 17 Example
Verify challenge code
In case there is a need to verify the backoffice challenge code before completing the registration when providing the code and secure code, this feature can be used to detect any errors in advance.
Please follow these guidelines closely.
public func verifyChallengeCode(
    challengeCode: String
) -> AnyPublisher<Result<Bool, TapOnMobileError>, Never> {
    // implementation returns a publisher
}
Code block 18 Function
This function requires one parameters:
- backOfficeCode: String - This is the 'Back Office Code' response from the merchant portal.
public func verifyChallengeCode(
    challengeCode: /* value here as String */
) -> AnyPublisher<Result<Bool, TapOnMobileError>, Never> {
    // implementation returns a publisher
}
Code block 19 Usage
Step-by-Step Guide:
- Ending Device Registration: Utilize the verifyChallengeCode(challengeCode: inputCode) method provided by TapOnMobile.shared to verify the provided code.
- Handle the result:
- success(Bool): Returns if the code is valid.
- failure(TapOnMobileError): If an error occurs during the code verification, an error of type TapOnMobileError is returned. For a detailed guide on handling failures returned by this method, please refer to the Error Handling section.
TapOnMobile.shared.verifyChallengeCode(challengeCode: inputCode)
    .receive(on: DispatchQueue.main)
    .sink { result in
        switch result {
        case .success(let isCodeValid):
            print("Finishing code verification: \(isCodeValid).")
        case .failure(let error):
            print("Finishing code verification: Error: \(error)")
        }
    }
    .store(in: &disposables)
Code block 20 Example
Handle Session expiration
After completing registration, you need to know how to handle session token expiration. To do this, review the sessionExpiration section and be aware of the following points:
- When the session token expires, we will need to log in with the secretCode entered during registration.
- Be careful when the token expires, so it doesn't happen in the middle of a transaction.
Login
This section covers how you login to your application. Please follow these guidelines closely.
Pre-requisites: Before beginning the login process, it's important to check that:
- Your device must support 'Tap to Pay on iPhone' functionality.
- The SDK must be properly initialized.
- You must have already registered.
- If the session expires, this has to be called again to create a new session or obtain a new one. Check session expiration section in quick guide for more information.
public func doLogin(pin: String?) -> AnyPublisher<Result<Success, TapOnMobileError>, Never> {
    // implementation returns a publisher
}
Code block 21 Function
This function requires the following parameter:
- pin: String? - The secure code for login. This is the same secure code used during the registration process. If nil, it will be handled by the SDK if auto-login is enabled.
TapOnMobile.shared.doLogin(pin: /* pin here as String? */)
Code block 22 Usage
Step-by-Step Guide:
- Perform Login: Use the doLogin(pin:) method provided by TapOnMobile.shared to perform a login operation. This function takes a secure code as a parameter.
- Handle the result:
- success(Success): In case of a successful login, a success is returned.
- failure(TapOnMobileError): If an error occurs during the login operation, an error of type TapOnMobileError is returned. For a detailed guide on handling failures returned by this method, please refer to the Error Handling section.
TapOnMobile.shared.doLogin(pin: self.pin)
    .receive(on: DispatchQueue.main)
    .sink { result in
        switch result {
        case .success(let success):
            print("Success login: \(success)")
        case .failure(let error):
            print("Error login: \(error)")
        }
    }
    .store(in: &disposables)
Code block 23 Example
Logout
This function is designed to securely terminate a user's session within an application or system. It is particularly useful for tasks such as loading new terminal settings or obtaining a new session token. Also to be used when a session is about to expire and a new Login is needed, Logout function must be called first.
public func doLogout() -> AnyPublisher<Result<Success, TapOnMobileError>, Never> {
    // implementation returns a publisher
}
Code block 24 Function
TapOnMobile.shared.doLogout()
Code block 25 Usage
Step-by-Step Guide:
- Perform Logout: Use the doLogout() method provided by TapOnMobile.shared to perform a logout operation.
- Handle the result:
- success(Success): In case of a successful logout, a success is returned
- failure(TapOnMobileError): If an error occurs during the logout operation, an error of type TapOnMobileError is returned. For a detailed guide on handling failures returned by this method, please refer to the Error Handling section.
.tapOnMobile.shared.doLogout()
    .receive(on: DispatchQueue.main)
    .sink { result in
        switch result {
        case .success(let success):
            print("Success logout: \(success)")
        case .failure(let error):
            print("Error logout: \(error)")
        }
    }
    .store(in: &disposables)
Code block 26 Example
Prepare device
This function will prepare the device for Tap to Pay on iPhone. A token will be loaded that contains information about the merchant and the terminal profile. The terminal profile defines which payment card schemes will be read and will also impose a minimal iOS version that is different from the minimal iOS version for TTPOI. Additionally, check the Apple Tap to Pay on iPhone Platform Terms and Conditions. Please follow these guidelines closely to ensure a smooth device preparation process.
public func prepareDevice() {
    // implementation here
}
Code block 27 Function
Pre-requisites: Before beginning the device preparation process, it's important to check that your device meets the following requirements:
- Your device must support 'Tap to Pay on iPhone' functionality.
- The user should be registered and logged in. Otherwise, it will return errors:
- TapOnMobileError.session(.sessionError): This error will be returned when you are not logged in.
- TapOnMobileError.session(.terminalUnregistered): This error will be returned when the device is not registered.
- This process should be done in the apps background as it could take some time but be aware that it will display the Tap To Pay on iPhone terms and conditions when called if they are not already accepted.
- This process should also be called every time the app comes from background as it will close the session when the app goes into background.
- This process can fail for several device configuration issues so please handle provided errors to facilitate user's guidance. For a detailed guide on handling failures returned by this method, please refer to the Error Handling section.
How to implement
- Calling prepareDevice() should be done on UIApplication.didBecomeActiveNotification event and after registration/login.
- Before calling prepareDevice(), a listener should be registered to know the current status in real time, of the prepare device functionality. When prepare device is complete, the listener should be removed if not used. The listener is PrepareDeviceListener.
- This process may take a couple of minutes because the device must perform security checks and data encoding. During this period the process will send numbers from 0 to 100 indicating the percentage of completion. When users begin a transaction, especially their first, displaying a loading screen is essential, and you can use a progress bar to show this completion percentage.
This is the listener used to receive real time events from prepare device functionality:
protocol PrepareDeviceListener {
    func onPercentageUpdated(percentage: Int)
    func onCompleted()
    func onError(error: TapOnMobileError)
}
Code block 28 CardReaderSessionEvent enum
These are the related functions:
TapOnMobile.shared.addPrepareDeviceListener(listener)
TapOnMobile.shared.removePrepareDeviceListener(listener)
TapOnMobile.shared.removeAllPrepareDeviceListeners()
TapOnMobile.shared.prepareDevice()
TapOnMobile.shared.getPrepareDevicePercentage()
Code block 29 Usage
This is an example of usage:
class ExampleClass: PrepareDeviceListener {

    init() {
        TapOnMobile.shared.addPrepareDeviceListener(self)
        TapOnMobile.shared.prepareDevice()
    }

    public func onPercentageUpdated(percentage: Int) {
        print("Prepare device progress: \(percentage)%")
    }

    public func onError(error: TapOnMobileError) {
        TapOnMobile.shared.removePrepareDeviceListener(self)
        print("Prepare device failure: \(error)")
    }

    public func onCompleted() {
        TapOnMobile.shared.removePrepareDeviceListener(self)
        print("Prepare device completed.")
    }
}
When calling prepareDevice(), the added listeners will start receive updates in here:
public func onPercentageUpdated(percentage: Int) {
    print("Prepare device progress: \(percentage)%")
}
When the percentage reaches its maximum value, onCompleted() will be called and the procedure of prepare device is completed:
public func onCompleted() {
    TapOnMobile.shared.removePrepareDeviceListener(self)
    print("Prepare device completed.")
}
``


If any error occurs during the procedure, onError(error: TapOnMobileError) will be called:
```swift
public func onError(error: TapOnMobileError) {
    TapOnMobile.shared.removePrepareDeviceListener(self)
    print("Prepare device failure: \(error)")
}
Additionally, there is a function that can retrieve the current progress of the prepare device procedure manually:
1. This function returns an Int that represent the progress of prepare device functionality, also received in PrepareDeviceListener. It reports the last progress: if the App comes from background, this function will return the last value obtained previously, so prepareDevice() must be called again to obtain a new updated and valid value:
TapOnMobile.shared.getPrepareDevicePercentage()
Transactions
IMPORTANT NOTE: The location services must be enabled and authorized by the user in order to use the rest of the functionalities of the TapOnMobile SDK. As location is mandatory a disclaimer should be shown to the user before doing a transaction. In case of denying this permission, an alert should be shown indicating the feature is not available without this permission.
Pre-requisites: Before making any transaction, it's essential to ensure the conditions below are met:
- Your device should support 'Tap to Pay on iPhone' functionality.
- Location services need to be enabled on your device.
- The SDK must be properly initialized.
- You must have already registered.
- You must be logged in.
- The device preparing process has successfully completed.
Transaction Detail
| Property | Type | Description |
|---|---|---|
| transactionId | String | Identifier for a transaction |
| transactionStatus | TransactionStatus | Represents the various statuses a transaction can have |
| transactionType | TransactionType | The type of transaction (e.g., AUTH, REFUND, etc.) |
| transactionAmount | Int | The amount of the transaction in minor units |
| tipAmount | Int? | Tip amount of the transaction in minor units |
| transactionDate | Date | Date and time of the transaction |
| merchantId | String | Identifier of the merchant |
| terminalId | String | Identifier of the terminal |
| cancellable | Bool | Indicates if the transaction can be cancelled (reversed) |
| applicationLabel | String? | Application label from the card |
| cardType | String? | Type of card used (e.g., VISA, MASTERCARD) |
| expiryDate | Date? | Expiry date of the card |
| authId | String | Authorization identifier |
| AID | String? | Application Identifier |
| cardNumber | String | Masked card number |
| responseCode | String? | Response code from the host |
| responseMsg | String? | Response message from the host |
| CID | String? | Cryptogram Information Data |
| applicationCryptogram | String? | Application cryptogram |
| externalID | String? | External identifier for the transaction |
| retrievalRefNum | String? | Retrieval Reference Number (RRN) |
| refundedTransactionId | String? | ID of the original transaction that was refunded |
| refundedDate | Date? | Date of the refund |
| refundedMaskedPan | String? | Masked PAN of the card used for the refund |
| isReversalAvailable | Bool? | Indicates if reversal is available for this transaction |
| paymentMethod | PaymentMethod | Payment method used (e.g., CARD, BLIK, QRCODE) |
| refundable | Bool? | Indicates if the transaction is refundable |
| ref1 | String? | Optional reference field 1 |
| ref2 | String? | Optional reference field 2 |
| currency | Currency? | Currency of the transaction |
| dccStatus | DCCStatus? | Status of Dynamic Currency Conversion |
| dccAmount | Int? | DCC amount in minor units |
| dccCurrency | Currency? | DCC currency |
| dccExchangeRate | Double? | Exchange rate for DCC |
| dccMarkup | Double? | Markup for DCC |
| dccEcbIndicator | Bool? | ECB indicator for DCC |
| transactionRetry | Int? | Number of retries for the transaction |
Note: A field is considered mandatory if it cannot be null.
- TransactionStatus:
| Status | Meaning |
|---|---|
| CLEARED | Transaction is authorized and cleared properly by acquirer. |
| PIN_REQUESTED | Pin is required to finish transaction. If something happens at this stage (ie. Mobile went death) then this status stays. In fact the result is - no transaction was done. |
| NEW | New transaction (not performed yet), just when transaction was created in DB |
| REJECTED | Transaction was rejected after initiation. similar to DECLINED, but due to other reasons, when refusal to make transaction is done earlier i.e. Overlay app pops up (some other app above ToM) or when the user minimizes the app during a transaction. DECLINE is done by processor, REJECT can be done by SoftPos kernel. |
| REFUNDED | Transaction was refunded and refund was successful. When the transaction was done (with CLEARED), and additional REFUND message was created to original one. The result is the money is returned to the card account. |
| TIMEOUT | Transaction authorization timeout (POS side). There is 120 seconds to read the card, 60 seconds to enter the PIN, 30 seconds for authorization. |
| USER_CANCELLED | Transaction is cancelled by user on terminal screen |
| ERROR | Transaction not authorized due to server error, if something happens that is extraordinary (technical part) |
| TERMINAL_DECLINED | Transaction was declined by terminal (i.e. Kernel declined because of expiry, declined by VISA/MC,…) |
| ONGOING | Transaction in progress, sent request to acquirer and waiting for the response from processor / acquirer (SIX) |
| AUTHORIZED | Transaction authorized successfully, after receiving the response from processor / acquirer, and accepted. For WL it will be automatically CLEARED. |
| DECLINED | Transaction authorization denied, (refused by processor/acquirer host) |
| CANCELLED | Transaction is cancelled after successful authorization |
| DCC_REQUIRED | Transaction requires DCC (Dynamic Currency Conversion). |
- TransactionType:
| Type | Meaning |
|---|---|
| AUTH | A successful transaction authorized |
| REFUND | A successful transaction refund |
- PaymentMethod:
| Type | Meaning |
|---|---|
| CARD | Transactions made using TTPOI or other NFC readers. |
| QRCODE | Transactions made using QR code payments. (Alternative Payment Method) |
| BLIK | Transactions made using BLIK. |
| UNKNOWN | Unknown payment method |
Transaction Process Event
The TransactionProcessEvent enum is a critical component of the SDK's reactive payment flow. It notifies the integrator about the different stages of a transaction in real-time.
| Event Case | Description |
|---|---|
| .displayingCardReader | The SDK is preparing and showing the card reader interface. |
| .processing | The transaction is currently being processed by the backend/terminal. |
| .finishProcessing | The processing stage has ended, but if paymentSolutionReceiptHandling is set to yes, the transaction result screen is still being displayed. |
| .completed(TransactionDetail) | The transaction has finished. This case carries the TransactionDetail object with the final status, metadata, and response codes. |
APM Transaction Process Event
The APMTransactionProcessEvent enum is an essential part of the SDK's reactive flow for Alternative Payment Methods (APMs), such as QR codes and BLIK. It tracks the lifecycle of an APM transaction and notifies the integrator about the various stages.
| Event Case | Description |
|---|---|
| .displayBrands([APMBrand]) | The SDK provides the list of configured brands to be displayed. |
| .displayQR(APMTransaction) | The SDK has generated and is displaying the QR code for the customer to scan. Carries the current APMTransaction state. |
| .processing(APMTransaction) | The transaction is currently being processed by the backend/terminal. |
| .completed(APMTransaction) | The APM transaction has finished. This case carries the final APMTransaction object with the completed status and metadata. |
Container management
The TapOnMobileSDK simplifies the integration of payment flows by providing a built-in mechanism to manage the user interface. The container parameter, available in all major transaction methods, allows the SDK to present its own screens directly on top of your application's view hierarchy.
Usage:
The container parameter is an optional UIViewController. When provided, the SDK uses it as the parent view controller to handle the navigation and display of transaction-related screens. This ensures a consistent and secure user experience without requiring you to implement these screens manually.
This parameter is available in the following methods:
- doPayment: For standard card payments (Tap to Pay).
- doRefund: For card transaction refunds.
- doQRPayment: For QR code-based payments.
- doQRRefund: For QR code transaction refunds.
- doBlikPayment: For BLIK payments.
- doBlikRefund: For BLIK transaction refunds.
Managed screens:
When a valid container is passed, the SDK automatically handles the following screens:
- Transaction Progress: Displays loading indicators and status updates while the transaction is being processed.
- Card Reader Interface: For doPayment and doRefund, the SDK presents the necessary UI for the "Tap to Pay" functionality, guiding the user to tap their card or device.
- Dynamic Currency Conversion (DCC): Conditionally displayed when currency options are available.
- Brand Animations: Card schemes sensory branding, auditory and haptic feedback.
- QR Code Display: For doQRPayment, the SDK generates and displays the QR code for the customer to scan.
- BLIK Interaction: For doBlikPayment, the SDK manages screens related to BLIK code processing and status confirmation.
- Result & Receipt: Controlled by the paymentSolutionReceiptHandling boolean parameter.
- f true (default): The SDK displays a final result screen (Success/Failure) and offers a digital receipt option.
- If false: The SDK returns control to your application immediately after the transaction completes, allowing you to implement your own result and receipt handling logic.
Sale
Key feature, this functionality let the users make payments using their device as a terminal.
public func doPayment(
    currency: String,
    requestedAmount: Int,
    reference: String?,
    tipAmount: Int? = nil,
    container: UIViewController? = nil,
    paymentSolutionReceiptHandling: Bool = true,
    checkoutId: String? = nil
) -> AnyPublisher<Result<TransactionProcessEvent, TapOnMobileError>, Never> {
    // implementation returns a publisher
}
Code block 30 Function
This function requires the following parameters:
- currency: String - For a transaction it's mandatory specify which currency should be used for the transaction.
- requestedAmount: String - The amount of money chosen as minor unit. The fractional digits are evaluated based in the currency. For example, 11.91€ must be sent as 1191. If tipping is used, this requested amount must be the total payment of the transaction, meaning base amount plus tip amount. The value must be positive (> 0).
- reference: String? - It is an optional text to be added to the transaction as a reference. Can be nil or be left empty in case of not wanting it to be added.
- tipAmount: Int? - It's an optional that indicates the amount of money used for tipping in this transaction. When the function is called, it requests a payment equivalent to the sum of amountRequested and tipAmount. After the transaction is completed, the tip can be retrieved from the transactionDetail.
- container: UIViewController? - An optional view controller that determines how the SDK manages payment screens. For more information, refer to the [container management]181) section.
- paymentSolutionReceiptHandling: Bool - A parameter that determines whether the transaction result screen is displayed when a container is provided. If true the transaction result screen is displayed. If false the transaction result screen is ignored and not shown.
- checkoutId: String? - Is an optional unique identifier used to verify that all transaction parameters match the pre-registered checkout details. When provided, the backend validates the transaction amount, currency, terminal ID, merchant ID, and other parameters against the checkout values before processing the transaction.
TapOnMobile.shared.doPayment(
    currency: /* currency here as String */,
    requestedAmount: /* amount here as Int */,
    reference: /* reference here as String? */,
    tipAmount: /* tipAmount here as Int? */,
    container: /* container here as UIViewController? */,
    paymentSolutionReceiptHandling: /* Bool here, default true */,
    checkoutId: /* checkoutId here as String? */
)
Code block 31 Usage
Step-by-Step Guide:
- Make a payment: Start by calling doPayment function and ensure you are putting the right parameters.
- Handle the result:
- success(TransactionProcessEvent): Returns the payment process events, from the card reader display to the transaction result information in the TransactionDetail object.
- failure(TapOnMobileError): If something goes wrong during the payment process this result will return an error of type 'TapOnMobileError'. For a detailed guide on handling failures returned by this method, please refer to the Error Handling section.
TapOnMobile.shared.doPayment(
    currency: currency,
    requestedAmount: Int(amount) ?? 0,
    reference: reference,
    tipAmount: Int(tipAmount),
    container: getRootViewController(),
    checkoutId: checkoutId
)
.receive(on: DispatchQueue.main)
.sink { [weak self] result in
    switch result {
    case .success(let paymentProcessEvent):
        switch paymentProcessEvent {
        case .completed(let transactionDetail):
            self?.transactionId = transactionDetail.transactionId
            self?.sdkFeedback.append("")
            self?.sdkFeedback.append(" - Finish: Success. Payment transaction id: \(transactionDetail.transactionId)")
        default:
            self?.sdkFeedback.append(" - update: \(paymentProcessEvent)")
        }
    case .failure(let error):
        self?.sdkFeedback.append(" Payment: Error: \(error)")
    }
}
.store(in: &disposables)
Code block 32 Example
Refund
Users can refund an amount between 0 and the total amount of the original payment. A transaction ID is required for this functionality. A Transaction can only be refunded once and only if it cannot be cancelled by a reversal.
Pre-requisites: Before being able to make a refund, it's necessary to ensure the conditions below are met:
- You must have a transaction id from a previous transaction.
- Transaction cannot be cancelled.
public func doRefund(
    currency: String,
    requestedAmount: Int,
    transactionId: String,
    reference: String?,
    container: UIViewController? = nil,
    paymentSolutionReceiptHandling: Bool = true,
    checkoutId: String? = nil
) -> AnyPublisher<Result<TransactionProcessEvent, TapOnMobileError>, Never> {
    // implementation returns a publisher
}
Code block 33 Function
This function requires parameters:
- currency: String - For a transaction it's mandatory specify which currency sign are you using.
- requestedAmount: String - The amount of money chosen as minor unit. The fractional digits are evaluated based in the currency. For example, 11.91€ must be sent as 1191.
- transactionId: String - A unique ID used to identify which transaction will be refunded
- reference: String? - It is an optional text to be added to the transaction as a reference. Can be nil or be left empty in case of not wanting it to be added.
- container: UIViewController? - An optional view controller that determines how the SDK manages payment screens. For more information, refer to the [container management]181) section.
- paymentSolutionReceiptHandling: Bool - A parameter that determines whether the transaction result screen is displayed when a container is provided. If true the transaction result screen is displayed. If false the transaction result screen is ignored and not shown.
TapOnMobile.shared.doRefund(
    currency: /* currency here as String */,
    requestedAmount: /* amount here as Int */,
    transactionId: /* transactionId here as String */,
    reference: /* reference here as String? */,
    container: /* container here as UIViewController? */,
    paymentSolutionReceiptHandling: /* Bool here, default true */,
    checkoutId: /* checkoutId here as String? */
)
Code block 34 Usage
Step-by-Step Guide:
- Make a refund: Start by calling doRefund function and ensure you are putting the right parameters. This process also saves your last transaction locally for getLastTransaction function.
- Handle the result:
- success(TransactionProcessEvent): Returns the refund process events, from the card reader display to the refund result information in the TransactionDetail object.
- failure(TapOnMobileError): If something goes wrong during the payment process this result will return an error of type 'TapOnMobileError'. For a detailed guide on handling failures returned by this method, please refer to the Error Handling section.
TapOnMobile.shared.doRefund(
    currency: currency,
    requestedAmount: Int(amount) ?? 0,
    transactionId: transactionId,
    reference: reference,
    container: getRootViewController(),
    checkoutId: checkoutId
)
.receive(on: DispatchQueue.main)
.sink { [weak self] result in
    switch result {
    case .success(let paymentProcessEvent):
        switch paymentProcessEvent {
        case .completed(let transactionDetail):
            self?.transactionId = transactionDetail.transactionId
            self?.sdkFeedback.append("")
            self?.sdkFeedback.append(" - Finish: Success. Refund transaction id: \(transactionDetail.transactionId)")
        default:
            self?.sdkFeedback.append(" - update: \(paymentProcessEvent)")
        }
    case .failure(let error):
        self?.sdkFeedback.append(" Payment: Error: \(error)")
    }
}
.store(in: &disposables)
Code block 35 Example
Reversal
The reversal feature enables users to cancel their last Sale. A transaction ID must be provided, along with an optional flag indicating whether the cancellation was initiated by the user.
Pre-requisites:
Before being able to perform a reversal, ensure the conditions below are met:
- You must have a transaction ID from a previous transaction.
- The transaction must have cancellable equal to true (normally only the last payment is available to perform a reversal).
public func doReversal(
    transactionId: String,
    isCancelledByUser: Bool = false
) -> AnyPublisher<Result<Success, TapOnMobileError>, Never> {
    // implementation returns a publisher
}
Code block 36 Function
Parameters
| Parameter | Type | Default | Description |
|---|---|---|---|
| transactionId | String | - | A unique ID used to identify which transaction will be cancelled. |
| isCancelledByUser | Bool | false | Indicates whether the reversal was explicitly requested by the user. This is primarily required when the transaction is manually cancelled by the user during DCC selection. |
isCancelledByUser Behavior
| Value | Resulting Transaction Status |
|---|---|
| true | .USER_CANCELLED - The transaction was intentionally cancelled by the end user. |
| false (default) | .CANCELLED - The transaction was cancelled by the system or by a non-user-driven flow. |
TapOnMobile.shared.doReversal(
    transactionId: /* transactionId here as String */,
    isCancelledByUser: /* Bool here, default false */
)
Code block 37 Usage
Step-by-Step Guide:
- Make a Reversal: Call the doReversal function with the required transactionId and, optionally, the isCancelledByUser flag.
- Handle the result:
- success(Success): The transaction has been successfully cancelled. The returned Success object reflects the appropriate status (.USER_CANCELLED or .CANCELLED) depending on the isCancelledByUser value.
- failure(TapOnMobileError): Something went wrong during the reversal process. For a detailed guide on handling failures, please refer to the Error Handling section.
TapOnMobile.shared.doReversal(
    transactionId: transactionId
)
.receive(on: DispatchQueue.main)
.sink { result in
    switch result {
    case .success(let transactionStatus):
        // transactionStatus reflects .CANCELLED
        print("Success reversal: \(transactionStatus)")
    case .failure(let error):
        print("Error reversal: \(error)")
    }
}
.store(in: &disposables)
Code block 38 Example
QR Payments
This functionality lets the users make payments using QR Code payment methods, such as: AliPay, Twint, Payconiq, WeChatPay, and more.
public func doQRPayment(
    requestedAmount: Int,
    tipAmount: Int?,
    reference: String?,
    container: UIViewController? = nil,
    paymentSolutionReceiptHandling: Bool = true
) -> AnyPublisher<Result<APMTransactionProcessEvent, TapOnMobileError>, Never> {
    // implementation returns a publisher
}
Code block 39 Function
This function requires the following parameters:
- requestedAmount: Int - The amount of money chosen as minor unit. The fractional digits are evaluated based in the currency. For example, 11.91€ must be sent as 1191. If tipping is used, this requested amount must be the total payment of the transaction, meaning base amount plus tip amount.
- tipAmount: Int? - It's an optional that indicates the amount of money used for tipping in this transaction. When the function is called, it requests a payment equivalent to the sum of amountRequested and tipAmount. After the transaction is completed, the tip can be retrieved from the transactionDetail.
- reference: String? - It is an optional text to be added to the transaction as a reference. Can be nil or be left empty in case of not wanting it to be added.
- container: UIViewController? - An optional view controller that determines how the SDK manages payment screens. For more information, refer to the [container management]181) section.
- paymentSolutionReceiptHandling: Bool - A parameter that determines whether the transaction result screen is displayed when a container is provided. If true the transaction result screen is displayed. If false the transaction result screen is ignored and not shown.
TapOnMobile.shared.doQRPayment(
    requestedAmount: /* amount here as Int */,
    tipAmount: /* tipAmount here as Int? */,
    reference: /* reference here as String? */,
    container: /* container here as UIViewController? */,
    paymentSolutionReceiptHandling: /* Bool here, default true */
)
Code block 40 Usage
Step-by-Step Guide*:
*Note: Only valid when container is nil.
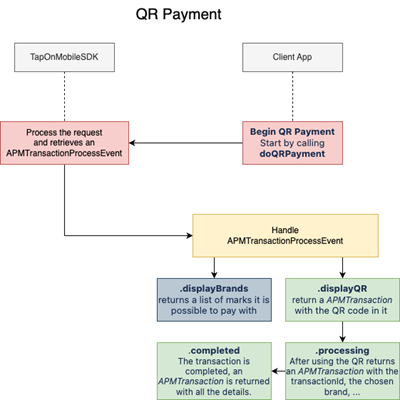
- Make a payment: Start by calling doQRPayment function and ensure you are putting the right parameters.
- Handle the result:
- success(APMTransactionProcessEvent): Returns the payment process events, from the QR code display to the transaction result information in the APMTransaction object.
public enum APMTransactionProcessEvent {
    case displayBrands([APMPaymentData.APMBrand])
    case displayQR(APMTransaction)
    case processing(APMTransaction)
    case completed(APMTransaction)
}
Code block 41 APMTransactionProcessEvent
- failure(TapOnMobileError): If something goes wrong during the payment process this result will return an error of type 'TapOnMobileError'. For a detailed guide on handling failures returned by this method, please refer to the Error Handling section.
TapOnMobile.shared.doQRPayment(
    requestedAmount: Int(amount) ?? 0,
    tipAmount: Int(tipAmount),
    reference: reference,
    container: getRootViewController()
)
.receive(on: DispatchQueue.main)
.sink { [weak self] result in
    guard let self = self else { return }

    switch result {
    case .success(let QRpaymentProcessEvent):
        switch QRpaymentProcessEvent {
        case .completed(let apmTransaction):
            self.transactionId = apmTransaction.transactionId
            self.sdkFeedback.append("")
            self.sdkFeedback.append(" - Finish: Success. Payment transaction id: \(apmTransaction.transactionId)")
        @unknown default:
            self.sdkFeedback.append(" - update: \(QRpaymentProcessEvent)")
        }
    case .failure(let error):
        self.sdkFeedback.append(" Payment: Error: \(error)")
    }
}
.store(in: &disposables)
Code block 42 Example
Note: APMTransaction object has a native functionality to convert it to TransactionDetail in case we want to use the same model.
Cancel QR Payments
This functionality lets the users cancel and ongoing QR Payment. This can only be used then the container is not used. Cancel is handled by the SDK.
public func cancelQRPayment(
    transactionId: String,
    reason: String = ""
) -> AnyPublisher<Result<APMTransaction, TapOnMobileError>, Never> {
    // implementation returns a publisher
}
Code block 43 Function
This function requires the following parameters:
- transactionId: String - Id of the transaction that has to be cancelled.
- reason: String - Additionally you can provide a reason for cancelation.
TapOnMobile.shared.cancelQRPayment(
    transactionId: /* transactionId here as String */,
    reason: /* reason here as String, default "" */
)
Code block 44 Usage
Step-by-Step Guide:
- Cancel an ongoing QR payment: Start by calling cancelQRPayment function and ensure you are putting the right parameters.
- Handle the result:
- success(APMTransaction): Returns the transaction result information in the APMTransaction object.
- failure(TapOnMobileError): If something goes wrong during the cancelation process this result will return an error of type 'TapOnMobileError'. For a detailed guide on handling failures returned by this method, please refer to the Error Handling section.
TapOnMobile.shared.cancelQRPayment(transactionId: transactionId, reason: reason)
    .receive(on: DispatchQueue.main)
    .sink { result in
        switch result {
        case .success(let apmTransaction):
            self.transactionId = apmTransaction.transactionId
            self.sdkFeedback.append(" - Finish: Success. Cancelled payment transaction id: \(apmTransaction.transactionId)")
        case .failure(let error):
            self.sdkFeedback.append("Payment: Error: \(error)")
        }
    }
    .store(in: &disposables)
Code block 45 Example
QR Refunds
This functionality allows users to process refunds for payments made via QR code payment method.
public func doQRefund(
    refundedTransactionId: String,
    refundAmount: Int,
    reference: String?
) -> AnyPublisher<Result<APMTransactionProcessEvent, TapOnMobileError>, Never> {
    // implementation returns a publisher
}
Code block 46 Function
This function requires the following parameters:
- transactionId: String - A unique ID used to identify which transaction will be refunded
- refundAmount: Int - The amount of money to be refunded, specified in the minor unit of the currency. The fractional digits are determined by the currency's specifications. For instance, a refund of 11.91€ should be expressed as 1191. The refundAmount should reflect the total amount to be returned from the original transaction.
- reference: String? - It is an optional text to be added to the transaction as a reference. Can be nil or be left empty in case of not wanting it to be added.
TapOnMobile.shared.doQRefund(
    refundedTransactionId: /* refundedTransactionId here as String */,
    refundAmount: /* refundAmount here as Int */,
    reference: /* reference here as String? */
)
Code block 47 Usage
Step-by-Step Guide:
- Make a refund: Start by calling doAPMRefund function and ensure you are putting the right parameters.
- Handle the result:
- success(APMTransactionProcessEvent): Returns the payment process events, from the QR code display to the transaction result information in the APMTransaction object.
- failure(TapOnMobileError): If something goes wrong during the payment process this result will return an error of type 'TapOnMobileError'. For a detailed guide on handling failures returned by this method, please refer to the Error Handling section.
TapOnMobile.shared.doQRRefund(
    refundedTransactionId: transactionId,
    refundAmount: Int(amount) ?? 0,
    reference: reference
)
.receive(on: DispatchQueue.main)
.sink { [weak self] result in
    guard let self = self else { return }

    switch result {
    case .success(let QRpaymentProcessEvent):
        switch QRpaymentProcessEvent {
        case .completed(let transaction):
            self.sdkFeedback.append(" - Finish: Success. Refunded transaction id: \(transaction.transactionId)")
            transactionId = transaction.transactionId
        default:
            break
        }
    case .failure(let error):
        self.sdkFeedback.append("QR Refund: Error: \(error)")
    }
}
.store(in: &disposables)
Code block 48 Example
BLIK Payment
This functionality lets the users make payments using BLIK payment method.
public func doBlikPayment(
    requestedAmount: Int,
    tipAmount: Int?,
    reference: String?,
    container: UIViewController? = nil,
    paymentSolutionReceiptHandling: Bool = true,
    payCode: String? = nil,
    verificationCode: String? = nil
) -> AnyPublisher<Result<APMTransactionProcessEvent, TapOnMobileError>, Never> {
    // implementation returns a publisher
}
Code block 49 Function
This function requires the following parameters:
- requestedAmount: Int - The amount of money chosen as minor unit. The fractional digits are evaluated based in the currency. For example, 11.91€ must be sent as 1191. If tipping is used, this requested amount must be the total payment of the transaction, meaning base amount plus tip amount.
- tipAmount: Int? - It's an optional that indicates the amount of money used for tipping in this transaction. When the function is called, it requests a payment equivalent to the sum of amountRequested and tipAmount. After the transaction is completed, the tip can be retrieved from the transactionDetail.
- reference: String? - It is an optional text to be added to the transaction as a reference. Can be nil or be left empty in case of not wanting it to be added.
- container: UIViewController? - An optional view controller that determines how the SDK manages payment screens. For more information, refer to the [container management]181) section.
- paymentSolutionReceiptHandling: Bool - A parameter that determines whether the transaction result screen is displayed when a container is provided. If true the transaction result screen is displayed. If false the transaction result screen is ignored and not shown.
- payCode: String? - It is a 6 or 9 digit code. When using the container parameter (not nil), this parameter has to be nil.
- verificationCode: String? - When the payCode has a length of 9, the verificationCode has to be not nil to complete the transaction. When using the container parameter (not nil), this parameter has to be nil.
TapOnMobile.shared.doBlikPayment(
    requestedAmount: /* amount here as Int */,
    tipAmount: /* tipAmount here as Int? */,
    reference: /* reference here as String? */,
    container: /* container here as UIViewController? */,
    paymentSolutionReceiptHandling: /* Bool here, default true */,
    payCode: /* payCode here as String? */,
    verificationCode: /* verificationCode here as String? */
)
Code block 50 Usage
**
Step-by-Step Guide*:**
*Note: Only valid when container is nil.
- Make a payment: Start by calling doBlikPayment function and ensure you are putting the right parameters.
- Handle the result:
- success(APMTransactionProcessEvent): Returns the payment process events, from the BlIK code display to the transaction result information in the APMTransaction object.
public enum APMTransactionProcessEvent {
    case displayBrands([APMPaymentData.APMBrand])
    case displayQR(APMTransaction)
    case processing(APMTransaction)
    case completed(APMTransaction)
}
Code block 51 APMTransactionProcessEvent
- failure(TapOnMobileError): If something goes wrong during the payment process this result will return an error of type 'TapOnMobileError'. For a detailed guide on handling failures returned by this method, please refer to the [Error Handling](/tap-on-mobile/ios/iOS-Error-Handling) section.
TapOnMobile.shared.doBlikPayment(
    requestedAmount: Int(amount) ?? 0,
    tipAmount: Int(tipAmount),
    reference: reference,
    container: getRootViewController(),
    payCode: payCode,
    verificationCode: verificationCode
)
.receive(on: DispatchQueue.main)
.sink { [weak self] result in
    guard let self = self else { return }

    switch result {
    case .success(let QRpaymentProcessEvent):
        switch QRpaymentProcessEvent {
        case .processing:
            self.sdkFeedback.append(" - Processing: Success. Processing Payment transaction id: \(self.transactionId)")
        case .completed(let transaction):
            self.sdkFeedback.append(" - Finish: Success. Payment transaction id: \(transaction.transactionId)")
            self.transactionId = transaction.transactionId
        default:
            break
        }
    case .failure(let error):
        self.sdkFeedback.append(" BLIK Payment: Error: \(error)")
    }
}
.store(in: &disposables)
Code block 52 Example
Note: APMTransaction object has a native functionality to convert it to TransactionDetail in case we want to use the same model.
BLIK Refunds
This functionality allows users to process refunds for payments made via BLIK payment method.
public func doBlikefund(
    refundedTransactionId: String,
    refundAmount: Int,
    reference: String?
) -> AnyPublisher<Result<APMTransactionProcessEvent, TapOnMobileError>, Never> {
    // implementation returns a publisher
}
Code block 53 Function
This function requires the following parameters:
- transactionId: String - A unique ID used to identify which transaction will be refunded
- refundAmount: Int - The amount of money to be refunded, specified in the minor unit of the currency. The fractional digits are determined by the currency's specifications. For instance, a refund of 11.91€ should be expressed as 1191. The refundAmount should reflect the total amount to be returned from the original transaction.
- reference: String? - It is an optional text to be added to the transaction as a reference. Can be nil or be left empty in case of not wanting it to be added.
TapOnMobile.shared.doBlikRefund(
    refundedTransactionId: /* refundedTransactionId here as String */,
    refundAmount: /* refundAmount here as Int */,
    reference: /* reference here as String? */
)
Code block 54 Usage
Step-by-Step Guide:
- Make a refund: Start by calling doBlikRefund function and ensure you are putting the right parameters.
- Handle the result:
- success(APMTransactionProcessEvent): Returns the payment process events, from the processing display to the transaction result information in the APMTransaction object.
- failure(TapOnMobileError): If something goes wrong during the payment process this result will return an error of type 'TapOnMobileError'. For a detailed guide on handling failures returned by this method, please refer to the Error Handling section.
TapOnMobile.shared.doBlikRefund(
    refundedTransactionId: transactionId,
    refundAmount: Int(amount) ?? 0,
    reference: reference
)
.receive(on: DispatchQueue.main)
.sink { [weak self] result in
    guard let self = self else { return }

    switch result {
    case .success(let QRpaymentProcessEvent):
        switch QRpaymentProcessEvent {
        case .completed(let transaction):
            self.sdkFeedback.append(" - Finish: Success. Refunded transaction id: \(transaction.transactionId)")
            self.transactionId = transaction.transactionId
        default:
            break
        }
    case .failure(let error):
        self.sdkFeedback.append("BLIK Refund: Error: \(error)")
    }
}
.store(in: &disposables)
Code block 55 Example
DCC Transactions
This functionality lets the users perform Dynamic Currency Conversion (DCC) transactions if the initial transaction has not been performed using the SDK UI.
public func doMakeTransactionFinishDCC(
    transactionId: String?,
    dccOfferAccepted: Bool
) -> AnyPublisher<Result<TransactionDetail, TapOnMobileError>, Never> {
    // implementation returns a publisher
}
Code block 56 Function
This function requires the following parameters:
- transactionId: String - The Id of the transaction that is being processed for DCC.
- dccOfferAccepted Bool - Indicates whether the user has accepted the Dynamic Currency Conversion (DCC) offer.
TapOnMobile.shared.doMakeTransactionFinishDCC(
    transactionId: /* transactionId here as String? */,
    dccOfferAccepted: /* dccOfferAccepted here as Bool */
)
Code block 57 Usage
Step-by-Step Guide*:
*Note: Only valid when container is nil.
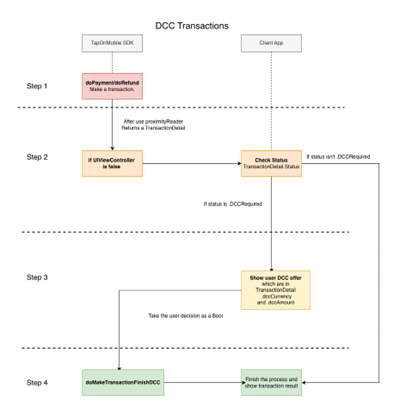
- Make a payment/refund: Make a transaction as described in the sale and redemption sections.
- Check TransactionDetail Status: Before finish, we must verify the transaction status. The necessary status for making a DCC offer is ".DCCRequired." The offer details are include in "TransactionDetail.dccCurrency" and "TransactionDetail.dccAmount."
- Finish the DCC Transaction: To finalise the transaction, the user must decide whether to accept the DCC offer. Once the decision is made, we call doMakeTransactionFinishDCC, passing the initial transactionID and the user's DCC decision as parameters.
- Handle the result:
- success(TransactionDetail): Returns the transaction details, including the transaction process events and the final result.
- failure(TapOnMobileError): If something goes wrong during the payment process this result will return an error of type 'TapOnMobileError'. For a detailed guide on handling failures returned by this method, please refer to the Error Handling section.
TapOnMobile.shared.doMakeTransactionFinishDCC(
    transactionId: transactionId,
    dccOfferAccepted: dccOptionSelected
)
.receive(on: DispatchQueue.main)
.sink { result in
    switch result {
    case .success(let success):
        print("Success - DCC TransactionFinished from \(success)")
    case .failure(let error):
        print("Error during transaction validation: \(error)")
    }
}
Code block 58 Example
Other core functionalities
Last Transaction
This functionality returns the last successful transaction made by the device and stored in local database.
This function uses local storage of the SDK. This gives no guarantee about the last processed transaction in case communication might have been broken. This function is deprecated, other history functions should be used that retrieve the data from the backend.
This function is deprecated, other history functions should be used that retrieve the data from the backend.
Pre-requisites: Before beginning the retrieval process, it's necessary to ensure the conditions below are met:
- You must have made a transaction previously.
public func getLastTransaction() -> AnyPublisher<Result<TransactionDetail, TapOnMobileError>, Never> {
    // implementation returns a publisher
}
Code block 59 Function
TapOnMobile.shared.getLastTransaction()
Code block 60 Usage
Step-by-Step Guide:
- Get Last Transaction: Start by calling the getLastTransaction function.
- Handle the result:
- success(TransactionDetail): If the function executes successfully, it will return the transaction detail of the last transaction.
- failure(TapOnMobileError): If something goes wrong this result will return an error of type 'TapOnMobileError'. For a detailed guide on handling failures returned by this method, please refer to the Error Handling section.
TapOnMobile.shared.getLastTransaction()
    .receive(on: DispatchQueue.main)
    .sink { [weak self] result in
        switch result {
        case .success(let lastTransaction):
            print("Success get last transaction: \(lastTransaction)")
        case .failure(let error):
            print("Error get last transaction: \(error)")
        }
    }
    .store(in: &disposables)TapOnMobile.shared.getLastTransaction()
    .receive(on: DispatchQueue.main)
    .sink { [weak self] result in
        switch result {
        case .success(let lastTransaction):
            print("Success get last transaction: \(lastTransaction)")
        case .failure(let error):
            print("Error get last transaction: \(error)")
        }
    }
    .store(in: &disposables)
Code block 61 Example
Get Info Init
This functionality retrieves initialization information about the SDK system, including configuration details such as whether automatic login is enabled for the terminal.
Pre-requisites: Before beginning the retrieval process, it's necessary to ensure the conditions below are met:
- The SDK must have been initialized successfully.
- The device must be registered and have an active session.
public func getInfoInit() -> AnyPublisher<Result<InfoInit, TapOnMobileError>, Never> {
    // implementation returns a publisher
}
Code block 62 Function
TapOnMobile.shared.getInfoInit()
Code block 63 Usage
Step-by-Step Guide:
- Get Info Init: Start by calling the getInfoInit function.
- Handle the result:
- success(InfoInit): If the function executes successfully, it will return the initialization information containing system configuration details.
- failure(TapOnMobileError): If something goes wrong this result will return an error of type 'TapOnMobileError'. For a detailed guide on handling failures returned by this method, please refer to the Error Handling section.
InfoInit Model Description
The InfoInit structure provides initial configuration and capabilities information for the SDK, typically used before or during the login and registration flows.
Properties:
| Property | Type | Description |
|---|---|---|
| isAutoLoginEnabled | Bool | Indicates whether the terminal is configured to allow automatic login. If true, the integrator can skip the manual secure code entry. |
| registerOptions | [RegisterOptions] | A list of available registration methods supported by the current merchant/terminal configuration. |
RegisterOptions (Enum)
This enum defines the possible ways a device can be registered in the system:
- .portal: The merchant can register the device through the Merchant Portal.
- .registrationCode: Registration is performed using a Backend-to-Backend registration code or token.
TapOnMobile.shared.getInfoInit()
    .receive(on: DispatchQueue.main)
    .sink { [weak self] result in
        switch result {
        case .success(let infoInit):
            print("Success get info init: \(infoInit)")
            if infoInit.isAutoLoginEnabled {
                print("Auto login is enabled")
            }
        case .failure(let error):
            print("Error get info init: \(error)")
        }
    }
    .store(in: &disposables)
Code block 64 Example
Transaction History
This section explains how to implement the transaction history fetch function and configure its filters. Please follow these guidelines.
Pre-requisites: Before implement transaction history, it's essential to ensure the conditions below are met:
- Your device should support 'Tap to Pay on iPhone' functionality.
- The SDK must be properly initialised.
- You must have already registered.
- You must be logged in.
public func fetchTransactionsHistory(
    page: Int,
    itemsPerPage: Int,
    dateFrom: String,
    dateTo: String,
    filterStatus: [String],
    filterType: [String],
    filterPaymentMethod: [String] = [
        PaymentMethod.CARD.rawValue,
        PaymentMethod.QRCODE.rawValue,
        PaymentMethod.BLIK.rawValue
    ]
) -> AnyPublisher<Result<TransactionsHistoryPage, TapOnMobileError>, Never> {
    // implementation returns a publisher
}
Code block 65 Function
This function requires the following parameters:
- Page: Int - Specifies the page number of the results to be retrieved. It is used for pagination.
- itemsPerPage: Int - Indicates the number of items to be displayed per page. It is also used for pagination.
- dateFrom: String - Represents the start date for filtering the results. It should be in a string format like YYYY-MM-DDTHH:mm:ss.sTZD (ISO 8601, Universal Standard). Check Date Formatting for details and examples.
- dateTo: String - Represents the end date for filtering the results. It should be in a string format like YYYY-MM-DDTHH:mm:ss.sTZD (ISO 8601, Universal Standard). Check Date Formatting for details and examples.
- filterStatus: [String] - List of strings used to filter the results based on their status. See TransactionStatus.
- filterType: [String] - List of strings used to filter the results based on their type. See TransactionType.
- filterPaymentMethod: [String] - List of strings used to filter the results based on their payment. See PaymentMethod.
Note: In case the filters are empty, no filters will be applied and all items will be returned.
)
TapOnMobile.shared.fetchTransactionsHistory(
    page: /* page here as Int */,
    itemsPerPage: /* itemsPerPage here as Int */,
    dateFrom: /* dateFrom here as String */,
    dateTo: /* dateTo here as String */,
    filterStatus: /* filterStatus here as [String] */,
    filterType: /* filterType here as [String] */,
    filterPaymentMethod: /* filterPaymentMethod here as [String] = [PaymentMethod.CARD.rawValue, PaymentMethod.QRCODE.rawValue, PaymentMethod.BLIK.rawValue] */
)
Code block 66 Usage
Step-by-Step Guide:
- Start by calling fetchTransactionsHistory(), this function returns a paged list of transactions made by the terminal. The page you are on and the number of transactions per page are set in the function parameters the same as filters.
- Handle the result:
- success(TransactionHistoryItems): Returns the list of transactions with this information:
- TransactionId: Identifier for a transaction.
- TransactionDate: Date on which the transaction was made
- TransactionStatus: Represents the various statuses a transaction can have.
- Amount: Amount of the transaction.
- TransactionType: Enumerates the different transaction types that can occur.
- CardType:Specifies the card used in the transaction.
- ApplicationLabel: Payment card application label, depending on the used card e.g. MasterCard DEBIT.
- PaymentMethod: Specific payment method selected to make the transaction
- AmountRefund: Amount of the refund.
- Currency: A Currency object representing the terminal's currency settings.
- failure(TapOnMobileError): If something goes wrong during the transaction fetch this result will return an error of type 'TapOnMobileError'. For a detailed guide on handling failures returned by this method, please refer to the Error Handling section.
- success(TransactionHistoryItems): Returns the list of transactions with this information:
TapOnMobile.shared.fetchTransactionsHistory(
    page: currentPage,
    itemsPerPage: itemsPerPage,
    dateFrom: dateFrom,
    dateTo: dateTo,
    filterStatus: selectedStatusFilters, // ["TransactionStatus.AUTHORIZED.rawValue", "TransactionStatus.DECLINED.rawValue", ...]
    filterType: [TransactionType.AUTH.rawValue, TransactionType.REFUND.rawValue],
    filterPaymentMethod: [PaymentMethod.CARD.rawValue, PaymentMethod.QRCODE.rawValue]
)
.receive(on: DispatchQueue.main)
.sink { [weak self] result in
    switch result {
    case .success(let transactionsResponse):
        self?.transactions.history.append(contentsOf: transactionsResponse)
    case .failure(let error):
        print("Transaction History: Error: \(error)")
    }
}
.store(in: &disposables)
Code block 67 Example
Filters description. There are three ways of filtering excluding date filtering:To use any filter, just use the provided enum. Example:
var selectedStatusFilters = ["TransactionStatus.AUTHORIZED.rawValue", "TransactionStatus.DECLINED.rawValue"]

var selectedTypeFilters = ["TransactionType.REFUND.rawValue"]

var selectedPaymentMethodFilters = ["PaymentMethod.CARD.rawValue", "PaymentMethod.QRCODE.rawValue"]
Code block 68 Example
Transaction Details
This section explains how to implement the transaction details fetch function. Please follow these guidelines.
Pre-requisites: Before implement transaction history, it's essential to ensure the conditions below are met:
- Your device should support 'Tap to Pay on iPhone' functionality.
- The SDK must be properly initialised.
- You must have already registered.
- You must be logged in.
public func fetchTransactionDetails(
    transactionId: String? = nil,
    reference: String? = nil,
    terminalId: String? = nil
) -> AnyPublisher<Result<TransactionDetail, TapOnMobileError>, Never> {
    // implementation returns a publisher
}
Code block 69 Function
This function requires the following parameters:
- transactionId (String, optional) - The unique identifier of the transaction made by the terminal. Either transactionId or reference must be provided.
- reference (String, optional) - The external reference (external_id) of the transaction. Works only if it is unique in the system. Either transactionId or reference must be provided.
- terminalId (String, optional) - The partner terminal ID used to confirm that the transaction belongs to the specified partner. This is an additional optional filter parameter.
Important: At least one of transactionId or reference must be provided.
TapOnMobile.shared.fetchTransactionsDetails(
    transactionId: "3fa85f64-5717-4562-b3fc-2c963f66afa6"
)
.receive(on: DispatchQueue.main)
.sink { [weak self] result in
    switch result {
    case .success(let transactionDetail):
        self?.transactionDetail = transactionDetail
    case .failure(let error):
        print("Transaction Detail Error: \(error.errorDescription)")
    }
}
.store(in: &disposables)
Code block 70 Usage
Step-by-Step Guide:
- Start by calling fetchTransactionsDetails(), This function retrieves information from a single transaction using at least one identifier parameter.
- Handle the result:
- success(TransactionDetail): If the function executes successfully, it will return the transaction detail of the transaction.
- failure(TapOnMobileError): If something goes wrong during the transaction fetch this result will return an error of type 'TapOnMobileError'. For a detailed guide on handling failures returned by this method, please refer to the Error Handling section.
TapOnMobile.shared.fetchTransactionsDetails(
    transactionId: transactionId,
    reference: nil,
    terminalId: nil
)
.receive(on: DispatchQueue.main)
.sink { [weak self] result in
    switch result {
    case .success(let transactionsResponse):
        self?.transactionDetail = transactionsResponse
    case .failure(let error):
        print("Transaction Detail: Error: \(error)")
    }
}
.store(in: &disposables)
Code block 71 Example
Transaction Count
This section explains how to implement the transaction count fetch function and configure its filters. Please follow these guidelines.
Pre-requisites: Before implement transaction history, it's essential to ensure the conditions below are met:
- Your device should support 'Tap to Pay on iPhone' functionality.
- The SDK must be properly initialised.
- You must have already registered.
- You must be logged in.
public func fetchTransactionsCount(
    page: Int,
    itemsPerPage: Int,
    dateFrom: String,
    dateTo: String,
    filterStatus: [String],
    filterType: [String],
    filterPaymentMethod: [String] = [
        PaymentMethod.CARD.rawValue,
        PaymentMethod.QRCODE.rawValue
    ]
) -> AnyPublisher<Result<TransactionsCount, TapOnMobileError>, Never> {
    // implementation returns a publisher
}
Code block 72 Function
This function requires the following parameters:
- Page: Int - Specifies the page number of the results to be retrieved. It is used for pagination.
- itemsPerPage: Int - Indicates the number of items to be displayed per page. It is also used for pagination.
- dateFrom: String - Represents the start date for filtering the results. It should be in a string format like YYYY-MM-DDTHH:mm:ss.sTZD (ISO 8601, Universal Standard). Check Date Formatting for details and examples.
- dateTo: String - Represents the end date for filtering the results. It should be in a string format like YYYY-MM-DDTHH:mm:ss.sTZD (ISO 8601, Universal Standard). Check Date Formatting for details and examples.
- filterStatus: [String] - List of strings used to filter the results based on their status.
- filterType: [String] - List of strings used to filter the results based on their type.
- filterPaymentMethod: [String] - List of strings used to filter the results based on their payment.
Note: In case the filters are empty, no filters will be applied and all items will be returned.
TapOnMobile.shared.fetchTransactionsCount(
    page: /* page here as Int */,
    itemsPerPage: /* itemsPerPage here as Int */,
    dateFrom: /* dateFrom here as String */,
    dateTo: /* dateTo here as String */,
    filterStatus: /* filterStatus here as [String] */,
    filterType: /* filterType here as [String] */,
    filterPaymentMethod: /* filterPaymentMethod here as [String] = [PaymentMethod.CARD.rawValue, PaymentMethod.QRCODE.rawValue] */
)
Code block 73 Usage
Step-by-Step Guide:
- Start by calling fetchTransactions(), this function returns a number of transactions made by the terminal. The page you are on and the number of transactions per page are set in the function parameters the same as filters.
- Handle the result:
- success(TransactionsCount): If successful, it returns the total of the transactions made by the current terminal.
- failure(TapOnMobileError): If something goes wrong during the transaction fetch this result will return an error of type 'TapOnMobileError'. For a detailed guide on handling failures returned by this method, please refer to the Error Handling section.
TapOnMobile.shared.fetchTransactionsCount(
    page: currentPage,
    itemsPerPage: itemsPerPage,
    dateFrom: dateFrom,
    dateTo: dateTo,
    filterStatus: selectedStatusFilters, // ["TransactionStatus.AUTHORIZED.rawValue", "TransactionStatus.DECLINED.rawValue", ...]
    filterType: [TransactionType.AUTH.rawValue, TransactionType.REFUND.rawValue],
    filterPaymentMethod: [PaymentMethod.CARD.rawValue, PaymentMethod.QRCODE.rawValue]
)
.receive(on: DispatchQueue.main)
.sink { [weak self] result in
    switch result {
    case .success(let transactionsCount):
        if transactionsCount.count < self?.itemsPerPage ?? 0 {
            self?.lastPageReached = true
        }
    case .failure(let error):
        print("Transaction Count: Error: \(error)")
    }
}
.store(in: &disposables)
Code block 74 Example
Filters description. There are three ways of filtering excluding date filtering. To use any filter, just use the provided enum. Example:
var selectedStatusFilters = ["TransactionStatus.AUTHORIZED.rawValue", "TransactionStatus.DECLINED.rawValue"]

var selectedTypeFilters = ["TransactionType.REFUND.rawValue"]

var selectedPaymentMethodFilters = ["PaymentMethod.CARD.rawValue", "PaymentMethod.QRCODE.rawValue"]
Code block 75 Example
Transaction Statistics
This feature returns the transactions statistics for the current terminal based on date and statistics type (by date or card brands).
Pre-requisites: Before calling this functionality, it's essential to ensure the conditions below are met:
- Your device should support 'Tap to Pay on iPhone' functionality.
- The SDK must be properly initialized.
- You must have already registered.
- You must be logged in.
public func getTransactionsStatistics(
    fromDate: Date,
    toDate: Date,
    statisticsType: TransactionsStatisticsType
) -> AnyPublisher<Result<[TransactionsStatistics], TapOnMobileError>, Never> {
    // implementation returns a publisher
}
Code block 76 Function
This function requires parameters:
- fromDate: Date - The starting date for the statistics.
- toDate: Date - The ending date for the statistics.
- statisticsType: TransactionsStatisticsType - The type of statistics that want to be obtained (by date or by card brands).
TransactionsStatisticsType
Defines the grouping criteria for the statistics request:
- .daily: Groups the transaction data by day.
- .brand: Groups the transaction data by card brand (e.g., Visa, Mastercard).
TapOnMobile.shared.getTransactionsStatistics(
    fromDate: /* fromDate here as Date */,
    toDate: /* toDate here as Date */,
    statisticsType: /* statisticsType here as TransactionsStatisticsType */
)
Code block 77 Usage
Step-by-Step Guide:
- Call the getTransactionsStatistics function: Start by calling getTransactionsStatistics function and make sure you are putting the right parameters.
- Handle the result:
- success([TransactionsStatistics]): Returns a list of items with the transaction statistics by date or by card brand (Brand name will be included in the description).
- failure(TapOnMobileError): If something goes wrong during the process an error of type 'TapOnMobileError' will be returned. For a detailed guide on handling failures returned by this method, please refer to the Error Handling section.
TransactionsStatistics Model Description
The SDK returns an array of TransactionsStatistics objects. Each object represents a group of statistics as defined by the statisticsType.
| Property | Type | Description |
|---|---|---|
| items | [TransactionsStatisticsItem] | An array of single item of transaction statistics (eg. daily summary, brand summary etc.) |
TransactionsStatisticsItem
| Property | Type | Description |
|---|---|---|
| fromDate | String | Starting timestamp of aggregated results |
| toDate | String | Final timestamp of aggregated results |
| amount | Int | Summary Amount of transactions |
TapOnMobile.shared.getTransactionsStatistics(
    fromDate: fromDate,
    toDate: toDate,
    statisticsType: .daily
)
.receive(on: DispatchQueue.main)
.sink { [weak self] result in
    switch result {
    case .success(let statistics):
        self?.sdkFeedback.append("Success - Statistics from \(fromDate.toFormattedString()) to \(toDate.toFormattedString()): \(statistics)")
    case .failure(let error):
        self?.sdkFeedback.append("Error during transaction validation: \(error)")
    }
}
.store(in: &disposables)
Code block 78 Example
Terminal Info
This section covers the procedure to retrieve terminal information using the provided TapOnMobile SDK method.
Pre-requisites:
- Your device must support 'Tap to Pay on iPhone' functionality.
- The SDK must be properly initialized.
- You must have already registered.
public func getTerminalInfo() -> AnyPublisher<Result<TerminalInfo, TapOnMobileError>, Never> {
    // implementation returns a publisher
}
Code block 79 Function
TapOnMobile.shared.getTerminalInfo()
Code block 80 Usage
Step-by-Step Guide:
- Invoke getTerminalInfo to initiate the retrieval process.
- Handle the result:
- success(TerminalInfo): You will receive a TerminalInfo object containing detailed terminal data.
- failure(TapOnMobileError): An error of type TapOnMobileError is returned indicating the nature of the problem encountered. For a detailed guide on handling failures returned by this method, please refer to the Error Handling section.
TerminalInfo Model Description
The TerminalInfo structure contains all the configuration details and capabilities of the registered terminal. It is returned by the getTerminalInfo() method and is crucial for determining which features (like tipping, refunds, or specific payment methods) are available to the user.
Properties
| Property | Type | Description |
|---|---|---|
| terminalId | String | The unique identifier for the terminal. |
| merchantId | String | The unique identifier for the merchant. |
| merchantName | String | The display name of the merchant. |
| address1 | String | The first line of the merchant's address. |
| address2 | String | The second line of the merchant's address. |
| isRefundAvailable | Bool | Indicates if refund operations are permitted on this terminal. |
| isReversalAvailable | Bool | Indicates if reversal operations are permitted. |
| currency | Currency | An object containing details about the terminal's default currency (code, name, exponent, etc.). |
| limitAmount | Int | The maximum transaction amount allowed for this terminal. |
| decimalDigitCount | Int | The number of decimal digits used for the currency. |
| permittedCountries | [String]? | A list of country codes where the terminal is authorized to operate. |
| profileId | String | The ID of the terminal profile applied to this terminal. |
| dynamicProperties | DynamicProperties | A set of dynamic configuration values. See below. |
| apmConfig | [APMConfig] | A list of configurations for Alternative Payment Methods (APMs). |
| apmEnabled | Bool | Global flag indicating if APMs are enabled for this terminal. |
| tipEnabled | Bool | Indicates if the tipping feature is enabled. |
| maxTipAmount | Int? | The maximum allowable tip amount (if tipping is enabled). |
| maxTipPercentage | Double? | The maximum allowable tip percentage (if tipping is enabled). |
| blikEnabled | Bool? | Indicates if BLIK payments are enabled. |
| terminalCode | String? | An optional code associated with the terminal, used for refund verification. |
Supporting Models
Currency
| Property | Type | Description |
|---|---|---|
| code | String | The currency code (e.g., "EUR"). |
| name | String | The full name of the currency. |
| unitLength | Int? | The length of the currency unit. |
| isoCode | Int? | The numeric ISO code for the currency. |
| exponent | Int? | The exponent used to calculate the actual value from the integer amount. |
DynamicProperties
Contains flexible configuration links and settings.
| Property | Type | Description |
|---|---|---|
| privacyPolicyUrl | String? | URL to the merchant's privacy policy. |
| cookiesPolicyUrl | String? | URL to the cookies policy. |
| userAgreementUrl | String? | URL to the user agreement |
| String? | Support email address. | |
| String? | Support WhatsApp number. | |
| phone | String? | Support phone number. |
| apmTimeout | Int? | Timeout duration for APM transactions (in seconds). |
| apmPulling | Int? | Polling interval for APM status checks (in seconds). |
| apmRefundTimeout | Int? | Timeout duration for APM refunds (in seconds). |
| rates | [Int] | A list of configured tip rates for the terminal. |
| referencePattern | String? | A regex pattern to validate transaction reference. |
| referenceEnabled | Bool | A boolean indicating if transaction reference is enabled. |
| blikTimeout | Int? | Timeout duration for BLIK transactions (in seconds). |
| blikPulling | Int? | Timeout duration for BLIK refunds (in seconds). |
APMConfig
Configuration for a specific Alternative Payment Method.
| Property | Type | Description |
|---|---|---|
| brandName | APMPaymentData.APMBrand | The brand of the APM (e.g., BLIK, TWINT). |
| brandFullName | String? | The full display name of the brand |
| customId | String? | A custom identifier for the APM integration. |
| isActive | Bool | Indicates if this specific APM is currently active. |
TapOnMobile.shared.getTerminalInfo()
    .receive(on: DispatchQueue.main)
    .sink { [weak self] result in
        switch result {
        case .success(let terminalInfo):
            self?.sdkFeedback.append("Terminal Information: \(terminalInfo)")
        case .failure(let error):
            self?.sdkFeedback.append("Error retrieving terminal information: \(error)")
        }
    }
    .store(in: &disposables)
Code block 81 Example
Contactless Reader Test
This section covers how you could test the device contactless reader with Tap to Pay on iPhone without making a transaction. Please follow these guidelines.
Pre-requisites: Before testing the card reader, it's essential to ensure the conditions below are met:
- Your device should support 'Tap to Pay on iPhone' functionality.
- The SDK must be properly initialised.
- You must have already registered.
- You must be logged in.
- The device preparing process has successfully completed.
public func doCardReaderTest(
    currency: String
) -> AnyPublisher<Result<CardReaderTestProcessEvent, TapOnMobileError>, Never> {
    // implementation returns a publisher
}
Code block 82 Function
This function requires parameters:
- currency: String - For the card test it's mandatory specify which currency sign are you using.
public enum CardReaderTestProcessEvent {
    case displayingCardReader
    case processing
    case completed(Bool)
}
Code block 83 CardReaderTestProcessEvent enum
TapOnMobile.shared.doCardReaderTest(
    currency: /* currency here as String */
)
Code block 84 Usage
Step-by-Step Guide:
- Make a card reader test: Start by calling doCardReaderTest function and ensure you are putting the currencyCode.
- Handle the result:
- success(CardTestProcessEvent): Returns a model with three possible events:
- displayingCardReader.
- processing.
- completed(Bool): This one returns a boolean value representing the test status.
- failure(TapOnMobileError): If something goes wrong during the test process an error of type 'TapOnMobileError' will be returned. For a detailed guide on handling failures returned by this method, please refer to the Error Handling section.
- success(CardTestProcessEvent): Returns a model with three possible events:
TapOnMobile.shared.doCardReaderTest(currency: currency)
    .receive(on: DispatchQueue.main)
    .sink { result in
        switch result {
        case .success(let cardTestProcessEvent):
            switch cardTestProcessEvent {
            case .completed(let isCardReadOK):
                print("Card Test result: \(isCardReadOK)")
            default:
                print("update: \(cardTestProcessEvent)")
            }
        case .failure(let error):
            print("Error testing card: \(error)")
        }
    }
    .store(in: &disposables)
Code block 85 Example
Unregister
Unregistering a device is also possible by implementing the unregister feature, which deletes local data created during the registration or Backend-to-backend terminal activation process and resets the register process.
Warning: This function should not be use in an automated way. Unregister should be avoided if not needed. Either use manual unregistering or unregistering using the merchant backend service.
public func unregister() -> AnyPublisher<Result<Success, TapOnMobileError>, Never> {
    // implementation returns a publisher
}
```swift
Code block 86 Function

```swift
TapOnMobile.shared.unregister()
Code block 87 Usage
Step-by-Step Guide:
- Invoke unregister to initiate the device unregister process.
- Handle the result:
- success(Success): When unregister process has been completed correctly a Success will be returned.
- failure(TapOnMobileError): An error of type TapOnMobileError is returned indicating the nature of the problem encountered. For a detailed guide on handling failures returned by this method, please refer to the Error Handling section.
TapOnMobile.shared.unregister()
    .receive(on: DispatchQueue.main)
    .sink { result in
        switch result {
        case .success:
            print("Success unregistering the device.")
        case .failure(let error):
            print("Error: \(error)")
        }
    }
    .store(in: &disposables)
Code block 88 Example
Validate Transaction
This functionality provides the option to validate a transaction before proceeding with a payment, allowing you to ensure everything is correct. While this step is not mandatory, it can enhance transaction handling. All transactions are automatically validated within the SDK before processing, but you have the option to perform an additional revalidation for even better control.
This validation checks:
- The session is ready for the transaction and is not about to expire.
- The location of the user is inside a permitted country.
- The amount does not overpass the limit of that terminal.
- The transaction type is available on that terminal. Ex: terminals that doesn't allow refunds.
Pre-requisites: Before calling this functionality, it's essential to ensure the conditions below are met:
- Your device should support 'Tap to Pay on iPhone' functionality.
- The SDK must be properly initialized.
- You must have already registered.
- You must be logged in.
public func validateTransaction(
    transactionServiceType: TransactionServiceType,
    requestedAmount: Int?,
    validate: String?
) -> AnyPublisher<Result<Success, TapOnMobileError>, Never> {
    // implementation returns a publisher
}
Code block 89 Function
This function requires parameters:
- transactionServiceType: Enum - It's mandatory the type of transaction to validate: Payment, Refund or Reversal.
- requestedAmount: Int? - The amount that needs to be validated. Only mandatory for payments and refunds
TapOnMobile.shared.validateTransaction(
    transactionServiceType: /* transactionServiceType here as TransactionServiceType */,
    requestedAmount: /* requestedAmount here as Int? */,
    validate: /* reference here as String? */
)
Code block 90 Usage
Step-by-Step Guide:
- Validate a transaction: Start by calling validateTransaction function and ensure you are putting the right parameters.
- Handle the result:
- success(Success): Returns a Success in case of a valid transaction.
- failure(TapOnMobileError): If something goes wrong during the test process an error of type 'TapOnMobileError' will be returned. For a detailed guide on handling failures returned by this method, please refer to the Error Handling section.
TapOnMobile.shared.validateTransaction(
    transactionServiceType: transactionServiceType,
    requestedAmount: transactionServiceType, // likely should be the actual amount
    reference: reference
)
.receive(on: DispatchQueue.main)
.sink { [weak self] result in
    switch result {
    case .success:
        self?.sdkFeedback.append("Success - Transaction request is valid")
    case .failure(let error):
        self?.sdkFeedback.append("Error during transaction validation: \(error)")
    }
}
.store(in: &disposables)
Code block 91 Example
Digital Receipt
This feature generates a digital receipt based on a transaction Id of a transaction made by the current terminal.
There are two types of digital receipt:
- QR code: Generates an url that can be used to generate a QR Code that points to the receipt.
- Email: The receipt will be sent to the provided email.
Pre-requisites: Before calling this functionality, it's essential to ensure the conditions below are met:
- Your device should support 'Tap to Pay on iPhone' functionality.
- The SDK must be properly initialized.
- You must have already registered.
- You must be logged in.
public func getDigitalReceipt(
    from transactionId: String,
    receiptType: ReceiptType,
    email: String?
) -> AnyPublisher<Result<ReceiptConfirmation, TapOnMobileError>, Never> {
    // implementation returns a publisher
}
Code block 92 Function
This function requires parameters:
- transactionId: String - Identifier of the transaction made by the terminal and from where the receipt will be generated.
- receiptType: ReceiptType - Indicates the type of receipt that needs to be returned (email or QR Code).
- email: String? - In case of email type receipts, an email should be provided.
TapOnMobile.shared.getDigitalReceipt(
    transactionId: /* transactionId here as String */,
    receiptType: /* receiptType here as ReceiptType */,
    email: /* email here as String? */
)
Code block 93 Usage
Step-by-Step Guide:
- Call the getDigitalReceipt function: Start by calling getDigitalReceipt function and make sure you are putting the right parameters.
- Handle the result:
- success(ReceiptConfirmation): Returns a model with the status of the receipt confirmation and an url in case of QR Code receipt type was selected.
- failure(TapOnMobileError): If something goes wrong during the receipt confirmation process an error of type 'TapOnMobileError' will be returned. For a detailed guide on handling failures returned by this method, please refer to the Error Handling section.
TapOnMobile.shared.getDigitalReceipt(
    from: transactionId,
    receiptType: .email,
    email: "<myemail@email.com>"
)
.receive(on: DispatchQueue.main)
.sink { [weak self] result in
    switch result {
    case .success(let receiptConfirmation):
        self?.sdkFeedback.append("Success - Receipt Confirmation Status: \(receiptConfirmation)")
    case .failure(let error):
        self?.sdkFeedback.append("Error during transaction validation: \(error)")
    }
}
.store(in: &disposables)
Code block 94 Example
Update secret code
This feature is designed to handle the process of changing the secret secure code.
Pre-requisites: Before calling this functionality, it's essential to ensure the conditions below are met:
- You must be logged in.
public func updateSecretCode(
    oldSecretCode: String,
    newSecretCode: String
) -> AnyPublisher<Result<Success, TapOnMobileError>, Never> {
    // implementation returns a publisher
}
Code block 95 Function
This function requires parameters:
- oldSecretCode: String - The old secret code.
- newSecretCode: String - Represents the new secret code to be implemented.
func updateSecretCode(oldSecretCode: String, newSecretCode: String) {
    // implementation here
}
Code block 96 Usage
Step-by-Step Guide:
- Make a update secret code: The updateSecretCode function handles the process of updating the existing secret code with a new one.
- Handle the result:
- success(success): Returns a Success in case of a update secret code.
- failure(TapOnMobileError): If something goes wrong during the process an error of type 'TapOnMobileError' will be returned. For a detailed guide on handling failures returned by this method, please refer to the Error Handling section.
TapOnMobile.shared.updateSecretCode(
    oldSecretCode: oldSecretCode,
    newSecretCode: newSecretCode
)
.receive(on: DispatchQueue.main)
.sink { [weak self] result in
    switch result {
    case .success:
        print("Success - Updated secret code")
    case .failure(let error):
        print("Error: \(error)")
    }
}
.store(in: &disposables)
Code block 97 Example
Relink account
This feature allows to re-sign the Tap to Pay on iPhone Terms and Conditions of the terminal profile's merchant using the Apple account registered on the device.
Pre-requisites: Before calling this functionality, it's essential to ensure the conditions below are met:
- Your device should support 'Tap to Pay on iPhone' functionality.
- The SDK must be properly initialized.
- You must be logged in.
public func relinkAccount() -> AnyPublisher<Result<Success, TapOnMobileError>, Never> {
    // implementation returns a publisher
}
Code block 98 Function
This function does not require parameters:
TapOnMobile.shared.relinkAccount()
Code block 99 Usage
Step-by-Step Guide:
- Make a relink account: Start by calling relinkAccount function, it will display the system screen to sign the TTPOI Terms and Conditions.
- Handle the result:
- success(success): Returns a Success in case of a relink account.
- failure(TapOnMobileError): If something goes wrong during the process an error of type 'TapOnMobileError' will be returned. For a detailed guide on handling failures returned by this method, please refer to the Error Handling section.
TapOnMobile.shared.relinkAccount()
    .receive(on: DispatchQueue.main)
    .sink { [weak self] result in
        switch result {
        case .success:
            print("Apple account relinked successfully")
        case .failure(let error):
            print("Error relinking Apple account: \(error)")
        }
    }
Code block 100 Example
Load Support Number
This section explains how to implement the load support number function. Please follow these guidelines.
The support number is a unique identifier assigned to the terminal, which is maintained for each installation of the application.
When the loadSupportNumber function is called, it first attempts to retrieve an existing support number. If no number is found, it generates a new one and persists it. This ensures the terminal has a consistent identifier for tracking and logging purposes.
Pre-requisites: Before calling this functionality, it's essential to ensure the conditions below are met:
- Your device should support 'Tap to Pay on iPhone' functionality.
- The SDK must be properly initialized.
public func loadSupportNumber() -> AnyPublisher<Result<String, TapOnMobileError>, Never> {
    // implementation returns a publisher
}
```swift
Code block 101 Function

This function not required parameters.

```swift
TapOnMobile.shared.loadSupportNumber()
Code block 102 Usage
Step-by-Step Guide:
- Load support number: Start by calling loadSupportNumber function.
- Handle the result:
- success(String): If success, it returns the support number. This number is also automatically configured for use in the SDK's internal logs for tracking and diagnostics.
- failure(TapOnMobileError): If something goes wrong during the test process an error of type 'TapOnMobileError' will be returned. For a detailed guide on handling failures returned by this method, please refer to the Error Handling section.
TapOnMobile.shared.loadSupportNumber()
    .receive(on: DispatchQueue.main)
    .sink { result in
        switch result {
        case .success(let supportNumber):
            print("Success - \(supportNumber)")
        case .failure(let error):
            print("Error during load support number: \(error)")
        }
    }
    .store(in: &disposables)
Code block 103 Example
Helper functionalities
Check Location
To get the current status of the location, which is required for the SDK to work with the main functionalities, this function is mainly used to help know the location status.
public func isLocationAuthorized() -> Bool {
    // implementation
}

public func isLocationDenied() -> Bool {
    // implementation
}
Code block 104 Function
Further :
- If isLocationDenied() gives true, the user can't use the main SDK functionalities.
- It should be explained to the user that the location services must be granted to use the App.
- Additionally, a button or navigation prompt should be included, which will take the user to the App's Settings screen to manually enable location permissions, as requestLocation() cannot function unless those permissions are granted.
- If this gives false, isLocationAuthorized() can then be checked.
- If isLocationAuthorized() gives true, the user can use the main SDK functionalities.
- If both give false, requestLocation() can be called. If the user accepts isLocationAuthorized() will return true
In iOS development, location permissions can be in one of four states:
- .authorizedWhenInUse: Location services are available. isLocationAuthorized() will return true.
- .restricted & .denied: Location services are currently unavailable. isLocationDenied() will return true.
- .notDetermined: Both functions will return false, then you should use requestLocation()
TapOnMobile.shared.isLocationAuthorized()

TapOnMobile.shared.isLocationDenied()
Code block 105 Usage
Request Location
This functionality requests Location Permission to the user. In order for it to work, please add "Privacy - Location When In Use Usage Description" field to your Info.plist file.
Pre-requisites: Before calling this functionality, it's essential to ensure the conditions below are met:
- Your device should support 'Tap to Pay on iPhone' functionality.
- The SDK must be properly initialized.
public func requestLocation() -> AnyPublisher<Result<Success, TapOnMobileError>, Never>
Code block 106 Usage
If the permission status is .notDetermined, we need to call requestLocation. The SDK will make a call to the permissions API and display a pop-up for the user to decide whether to accept
TapOnMobile.shared.requestLocation()
    .receive(on: DispatchQueue.main)
    .sink { result in
        switch result {
        case .success:
            print("request location - Success")
        case .failure(let error):
            print("Request location - Error: \(error)")
        }
    }
    .store(in: &disposables)
Code block 107 Usage
Note: If the value of RequestLocationResult is .restricted or .denied, you will need to handle this by showing the user that the app needs this permission and directing them to the settings to change the location permissions.
Check device registered
This function doesn't require any parameter inputs and is used to confirm if a device is already registered.
public func isDeviceRegistered() -> AnyPublisher<Result<Bool, TapOnMobileError>, Never> {
    // implementation returns a publisher
}
Code block 108 Function
TapOnMobile.shared.isDeviceRegistered()
Code block 109 Usage
Step-by-Step Guide:
- Check Device Registration Status: Use the isDeviceRegistered() method provided by TapOnMobile.shared to check the registration status of the device.
- Handle the result:
- success(Bool): Returns a boolean that indicates if the device has already been registered.
- failure(TapOnMobileError): If something goes wrong, an error of type 'TapOnMobileError' will be returned.
The response returned is an 'AnyPublisher' that will return a 'Result' containing either a success (with a Boolean representing the device's registration status) or a failure (with an error of type 'TapOnMobileError'). For a detailed guide on handling failures returned by this method, please refer to the [Error Handling]152) section.
TapOnMobile.shared.isDeviceRegistered()
    .receive(on: DispatchQueue.main)
    .sink { result in
        switch result {
        case .success(let deviceAlreadyRegistered):
            if deviceAlreadyRegistered {
                print("Device already registered")
            } else {
                print("Device is not registered.")
            }
        case .failure(let error):
            print("Error: \(error)")
        }
    }
    .store(in: &disposables)
Code block 110 Example
SDK Version
This section covers how to retrieve the Software Development Kit (SDK) version for your application.
public func getSDKVersion() -> AnyPublisher<Result<String, TapOnMobileError>, Never> {
    // implementation returns a publisher
}
Code block 111 Function
TapOnMobile.shared.getSDKVersion()
Code block 112 Usage
Step-by-Step Guide:
- Get SDK Version: Start by calling the getSDKVersion function.
- Handle the result:
- success(String): Returns a String indicating the version of the installed SDK.
- failure(TapOnMobileError): If something goes wrong, an error of type 'TapOnMobileError' will be returned. For a detailed guide on handling failures returned by this method, please refer to the Error Handling section.
TapOnMobile.shared.getSDKVersion()
    .receive(on: DispatchQueue.main)
    .sink { result in
        switch result {
        case .success(let sdkVersion):
            print("SDK Version: \(sdkVersion)")
        case .failure(let error):
            print("Error: \(error)")
        }
    }
    .store(in: &disposables)
Code block 113 Example
Get Terminal Id
This section covers how to retrieve the terminal Id of the terminal used in the current device.
public func getTerminalID() -> AnyPublisher<Result<String, TapOnMobileError>, Never> {
    // implementation returns a publisher
}
Code block 114 Function
TapOnMobile.shared.getTerminalID()
Code block 115 Usage
Step-by-Step Guide:
- Get Terminal id: Start by calling the getTerminalID function.
- Handle the result:
- success(String): Returns a String indicating the terminal id of the registered device.
- failure(TapOnMobileError): If something goes wrong, an error of type 'TapOnMobileError' will be returned. For a detailed guide on handling failures returned by this method, please refer to the Error Handling section.
TapOnMobile.shared.getTerminalID()
    .receive(on: DispatchQueue.main)
    .sink { result in
        switch result {
        case .success(let terminalId):
            print("Terminal id: \(terminalId)")
        case .failure(let error):
            print("Error: \(error)")
        }
    }
    .store(in: &disposables)
Code block 116 Example
Session Expiration
This session functionality is responsible for retrieving the precise timestamp that indicates the exact moment when the current session will expire.
public func getSessionExpiration() -> AnyPublisher<Result<Double, TapOnMobileError>, Never> {
    // implementation returns a publisher
}
Code block 117 Function
TapOnMobile.shared.getSessionExpiration()
Code block 118 Usage
Step-by-Step Guide:
- Get SDK Version: Start by calling the getSessionExpiration function.
- Handle the result:
- success(Double): Returns a Double representing the timestamp when the current session expires.
- failure(TapOnMobileError): If something goes wrong, an error of type 'TapOnMobileError' will be returned.
The response returned is an 'AnyPublisher' that will return a 'Result' containing either a success (with a Double representing the timestamp in seconds) or a failure (with an error of type 'TapOnMobileError'). For a detailed guide on handling failures returned by this method, please refer to the Error Handling section.
If the session expires, some functions will return a session error. Ensure to handle this scenario appropriately.
An efficient example of how to check and handle it would be to compare the timestamp obtained from getSessionExpiration() with the current time. If the obtained timestamp is older, it means that the session has expired.
TapOnMobile.shared.getSessionExpiration()
    .receive(on: DispatchQueue.main)
    .sink { result in
        switch result {
        case .success(let sessionExpiration):
            print("SessionExpiration: \(sessionExpiration)")

            if Date().timeIntervalSince1970 > sessionExpiration {
                print("Session has expired")
            } else {
                print("Current session is still available")
            }
        case .failure(let error):
            print("Error: \(error)")
        }
    }
    .store(in: &disposables)
Code block 119 Example
Session Expiration Notification
We have enhanced the session handling functionality by adding a Session Expiration Notification. This feature allows client applications to subscribe to a notification that triggers whenever a user's session expires. This enhancement can significantly improve user experience and application security.
Key features:
- Notification for Session Expiration: The SDK now broadcasts a SESSION_EXPIRED_NOTIFICATION whenever the user's session has expired.
- Subscription Capability: Client apps can subscribe to this notification easily, enabling seamless user interface updates.
- Customizable User Interaction: The client app can utilize this notification to display a popup or message, prompting users to re-authenticate, thus maintaining session continuity.
public static let SESSION_EXPIRED_NOTIFICATION: NSNotification.Name = NSNotification.Name("SessionExpired")
Code block 120 Function
func addObserver() {
    NotificationCenter.default.addObserver(
        self,
        selector: #selector(self.handleSessionExpiration),
        name: TapOnMobile.SESSION_EXPIRED_NOTIFICATION,
        object: nil
    )
}

@objc private func handleSessionExpiration(notification: NSNotification) {
    // Code to display a session expiration popup
    // Prompt the user to login again
}
Code block 121 Usage
Internal Certificate Expiration Unregister Notification
The SDK includes internal security certificates that can expire. When they do, the user is instantly unregistered. To improve user experience and security, we introduce an Internal Certificate Expiration Unregister Notification. This feature allows client applications to subscribe to a notification that triggers when internal certificates expire, alerting them to the user's unregistration.
Certificate expiration could only happen after a user hasn't logged in the app for more than three months.
Key features:
- Notification for Internal Certificate Expiration Unregister: The SDK now broadcasts a CERTIFICATES_EXPIRED_UNREGISTERED_NOTIFICATION whenever the user is unregistered by the expiration of the internal certificates.
- Subscription Capability: Client apps can subscribe to this notification easily, enabling seamless user interface updates.
- Customizable User Interaction: The client app can utilize this notification to display a popup or message, prompting users to re-register, thus maintaining session continuity.
public static let SESSION_EXPIRED_NOTIFICATION: NSNotification.Name = NSNotification.Name("CertificatesExpiredUnregistered")
Code block 122 Function
func addObserver() {
    NotificationCenter.default.addObserver(
        self,
        selector: #selector(self.handleCertificatesExpiredUnregistered),
        name: TapOnMobile.CERTIFICATES_EXPIRED_UNREGISTERED_NOTIFICATION,
        object: nil
    )
}

@objc private func handleCertificatesExpiredUnregistered(notification: NSNotification) {
    // Code to display user unregistered popup
    // Prompt the user to register again
}
Code block 123 Usage
Language Handling
This section covers how to setup language for the UI language managed by TapOnMobileSDK.
Pre-requisites: Before calling this functionality, it's essential to ensure the conditions below are met:
- Your device should support 'Tap to Pay on iPhone' functionality.
- The SDK must be properly initialized.
The language can be configured during SDK initialization. Using the TapOnMobileLanguage enum
public enum TapOnMobileLanguage: String, CaseIterable {
    case english
    case dutch
    case french
    case german
    case italian
    case czech
    case polish
    case hungarian
    case slovak
    case slovenian
    case croatian
}
Code block 124 TapOnMobileLanguage.swift
However, this is not the only way to configure the language, it can also be updated.
public func updateLanguage(language: TapOnMobileLanguage)
    -> AnyPublisher<Result<Success, TapOnMobileError>, Never> {
    // implementation returns a publisher
}
Code block 125 Function
TapOnMobile.shared.updateLanguage(language: TapOnMobileLanguage)
Code block 126 Usage
Step-by-Step Guide:
- Update the language: Start by calling the updateLanguage function and enter one of the cases available in the TapOnMobileLanguages enum:
- Handle the result:
- success(success): Returns a Success in case the language update has been successful .
- failure(TapOnMobileError): If something goes wrong during the process an error of type 'TapOnMobileError' will be returned. For a detailed guide on handling failures returned by this method, please refer to the Error Handling section.
TapOnMobile.shared.updateLanguage(language: .english)
    .receive(on: DispatchQueue.main)
    .sink { result in
        switch result {
        case .success:
            print("Language updated successfully")
        case .failure(let error):
            print("Error: \(error)")
        }
    }
    .store(in: &disposables)
Code block 127 Example
Date Formatting
All dates sent to the backend must be strings formatted as YYYY-MM-DDTHH:mm:ss.sTZD (ISO 8601, Universal Standard). Formatting examples here:
extension Date {
    func withBackendFormat() -> String {
        let dateFormatter = DateFormatter()
        dateFormatter.dateFormat = "yyyy-MM-dd'T'HH:mm:ssZ"
        return dateFormatter.string(from: self)
    }
}

extension String {
    func withBackendFormat() -> Date? {
        let dateFormatter = DateFormatter()
        dateFormatter.dateFormat = "yyyy-MM-dd'T'HH:mm:ssZ"
        return dateFormatter.date(from: self)
    }
}
Code block 128 Example